Description:
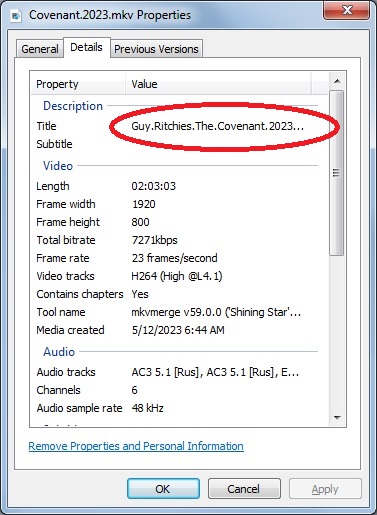
The Media Title is shown ‘Wrong’. This even though the path of the Media is correct and all the Medatadata has been properly generated with Medatadata Utility.
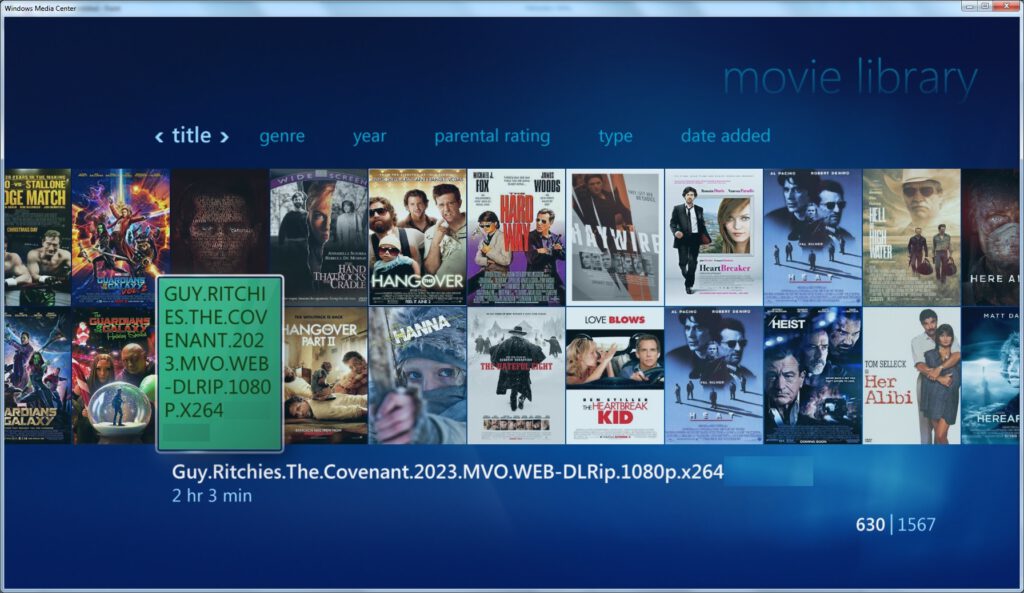
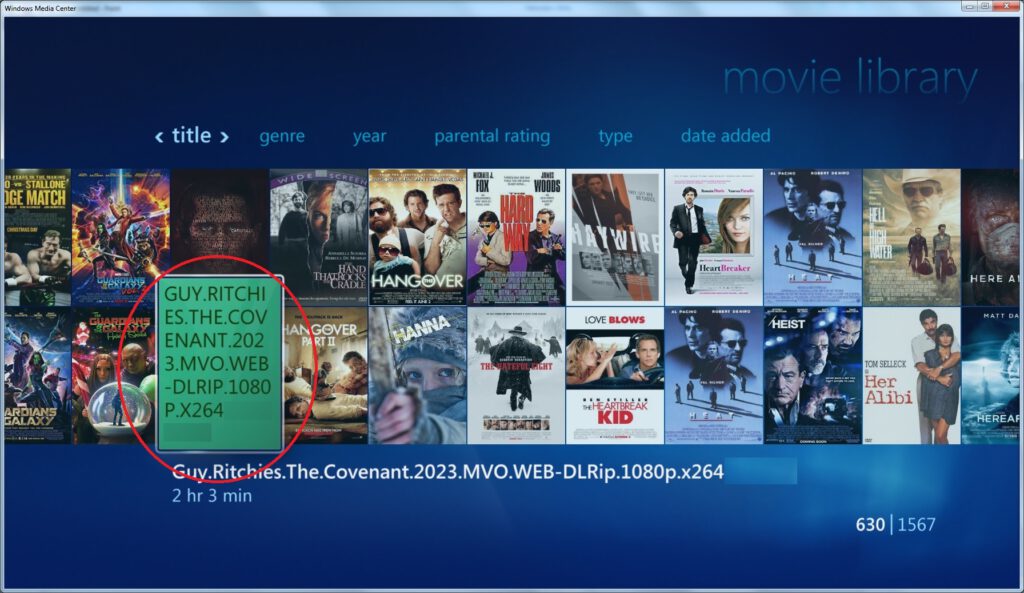
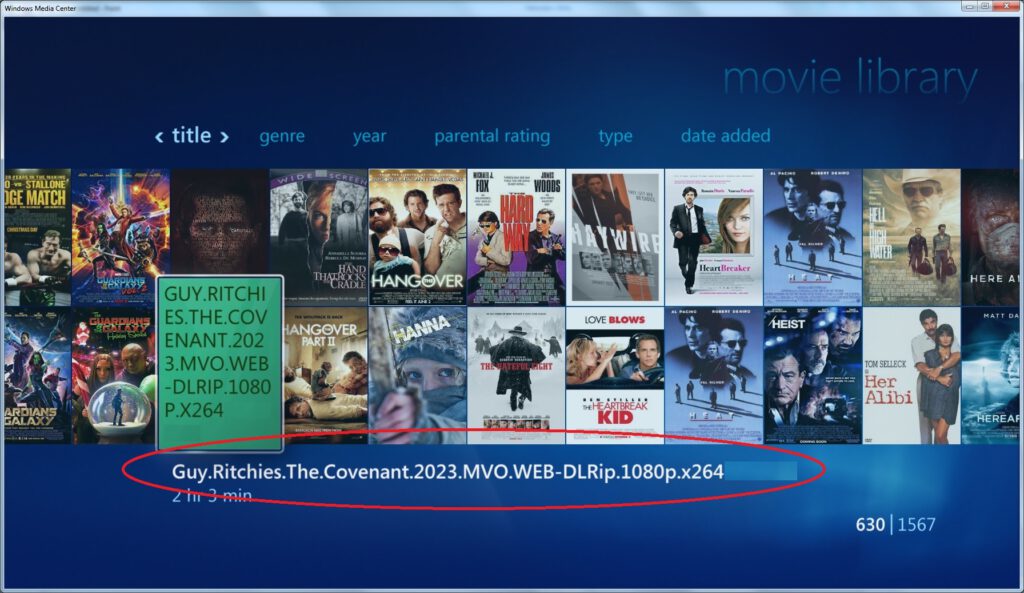
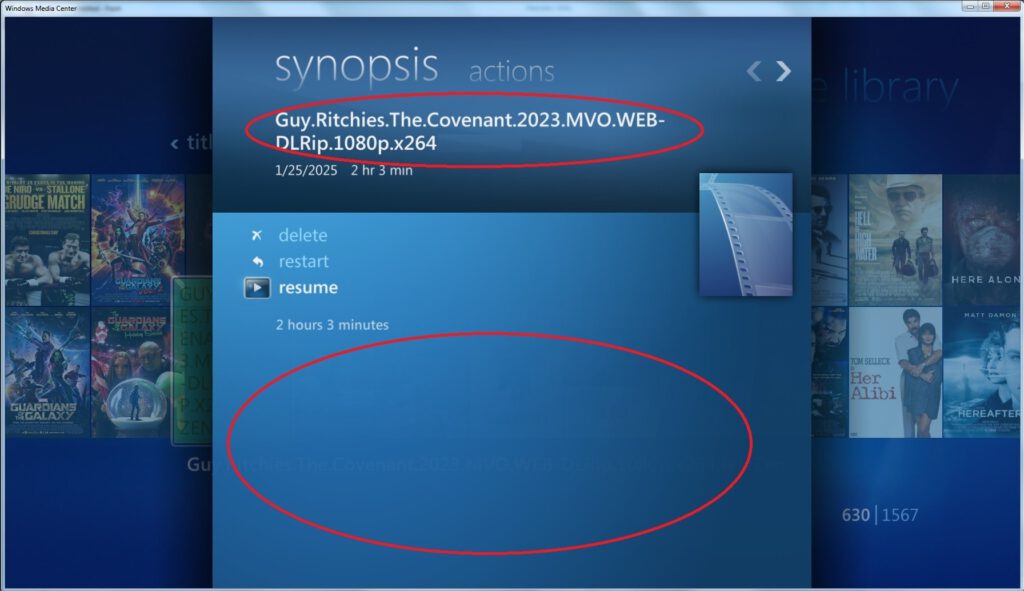
Cause:
2 Main possible Options:
1 – Media has been ripped to a single file.
2 – DVD Rip
Resolution:
1 – Media has been ripped to a single file.
- Metadata Utility Verification
- From Medatadata Utility open the Path location for the media
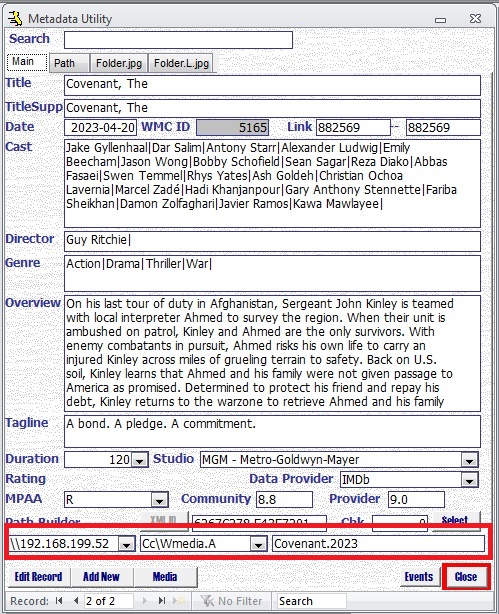
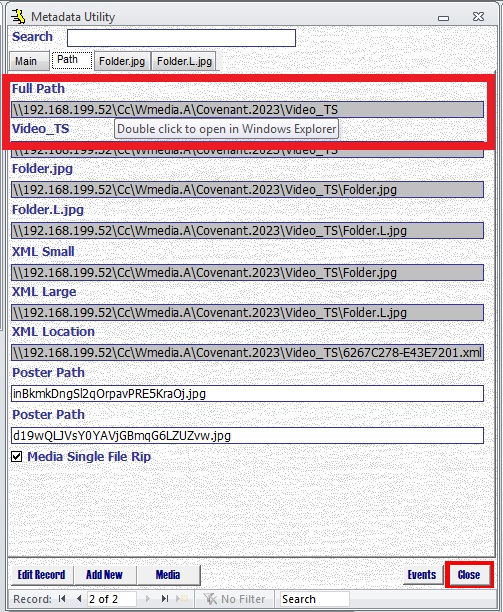
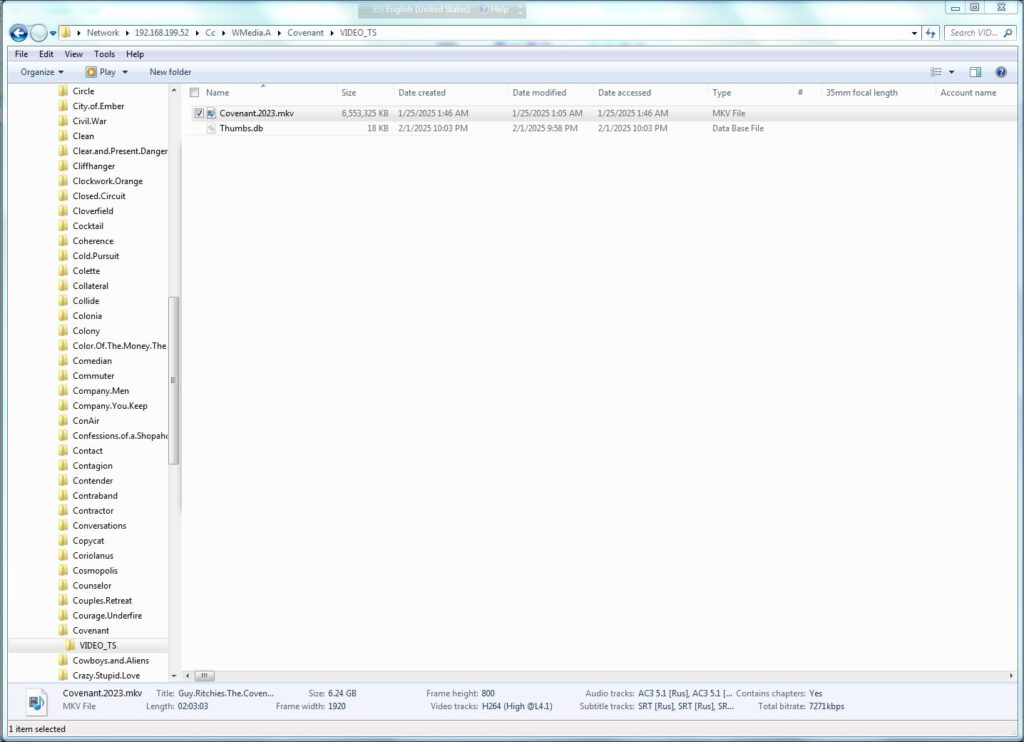
Note:
- Media has been ripped into a single File
- No Metadata Information, either XML Files and/or CoverArt Files are found
- Applicable/Possible if the Media has been ripped into a single File
- Place the Record in Edit Mode (double click on the Title or click on the Edit Button)
- Select Media Single File Rip
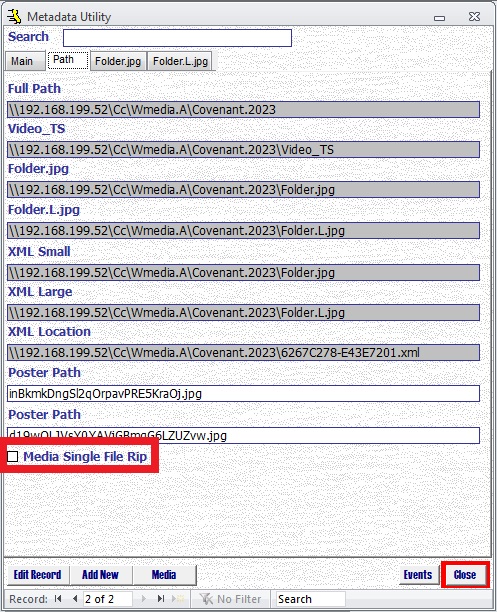
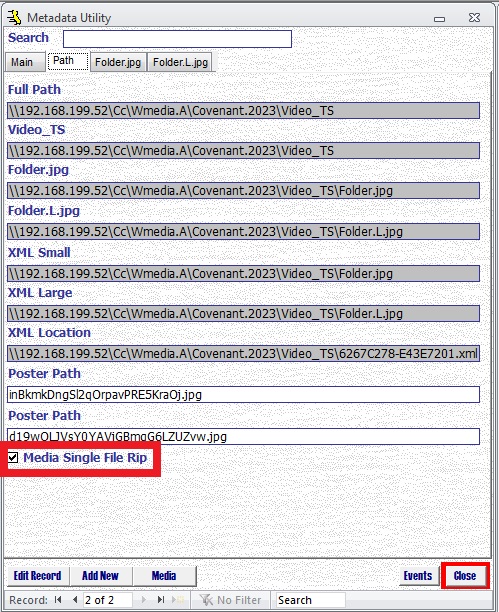
- Generate the Medatadata Information
as well as
- Download the Coverart Information
- Verification files have been generated
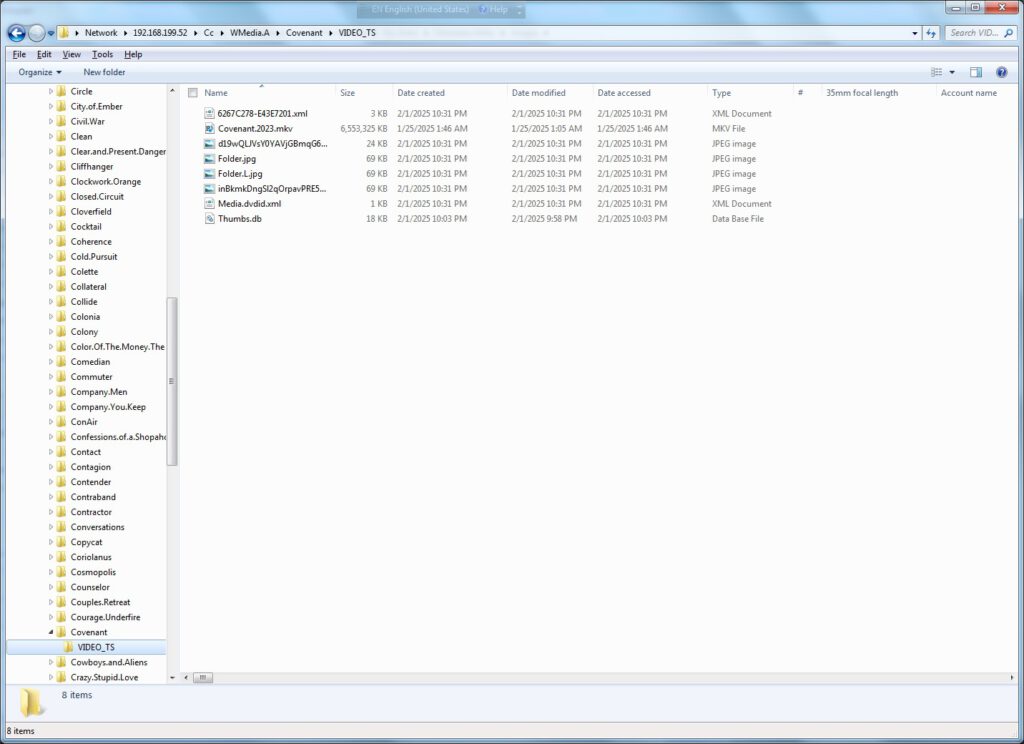
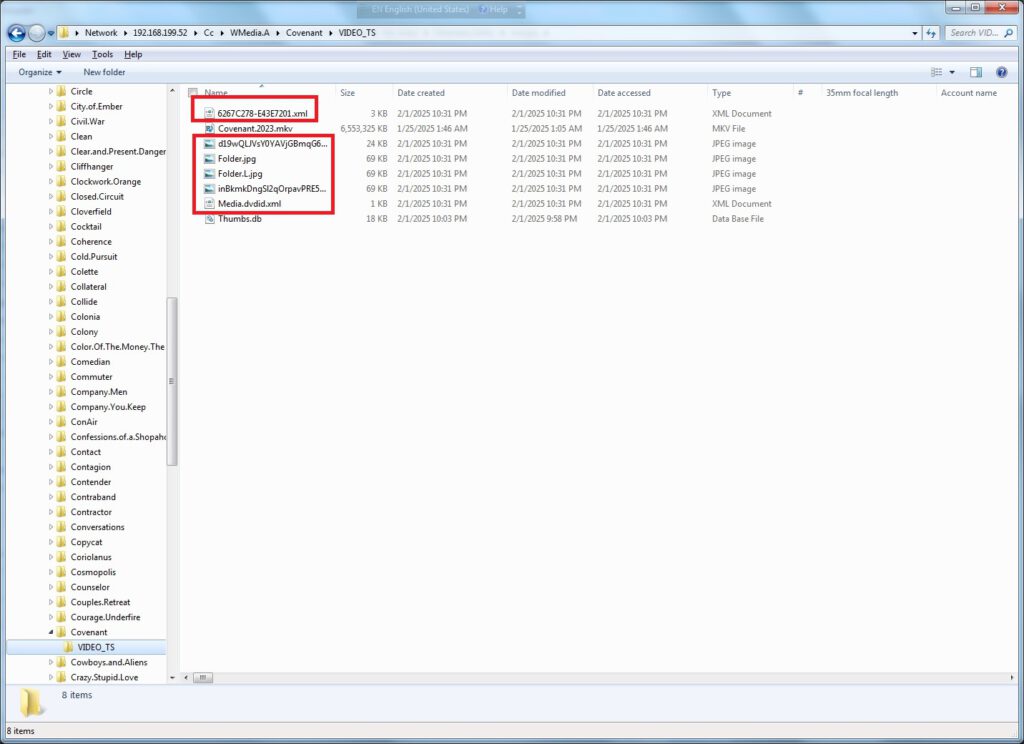
Media Title Changes:
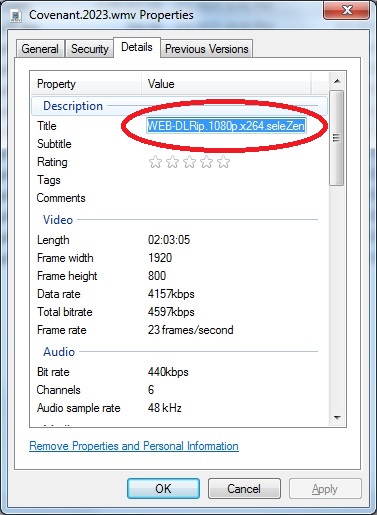
Right click on the Media File and select Properties
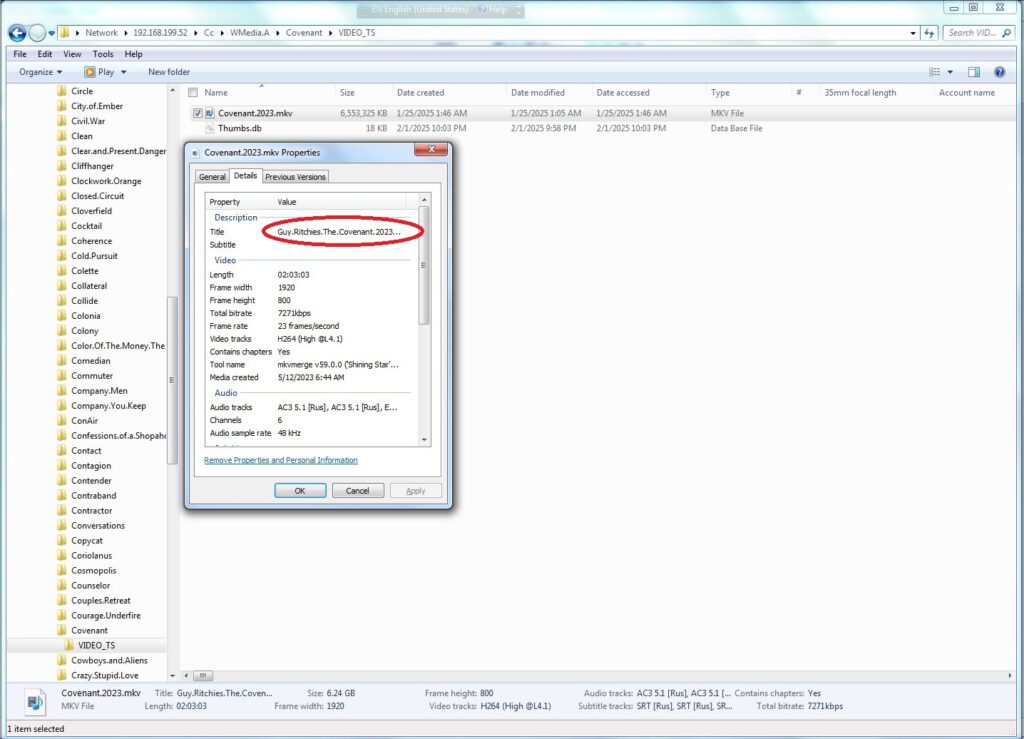
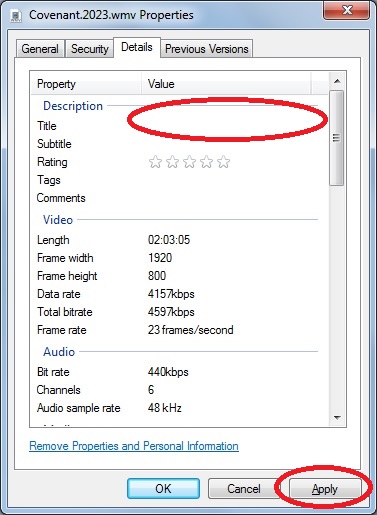
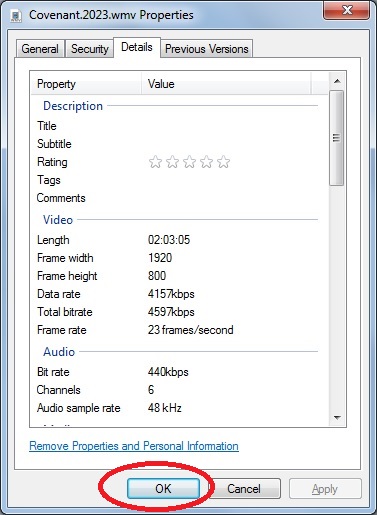
Delete the contents in the Property Value ‘Title’ – click Apply – Click Ok to close the properties Window.
2 – DVD Rip
- Generate XML Medatadata Information for the Media
- Download the corresponding Mediaart for the Media
Results:
Metadata Information for the Media will be shown
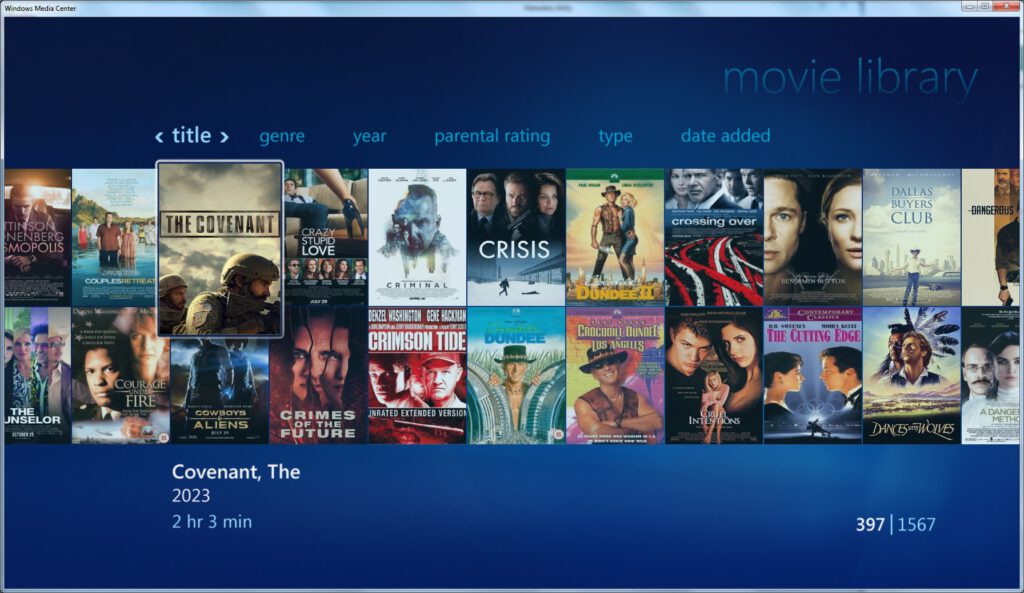
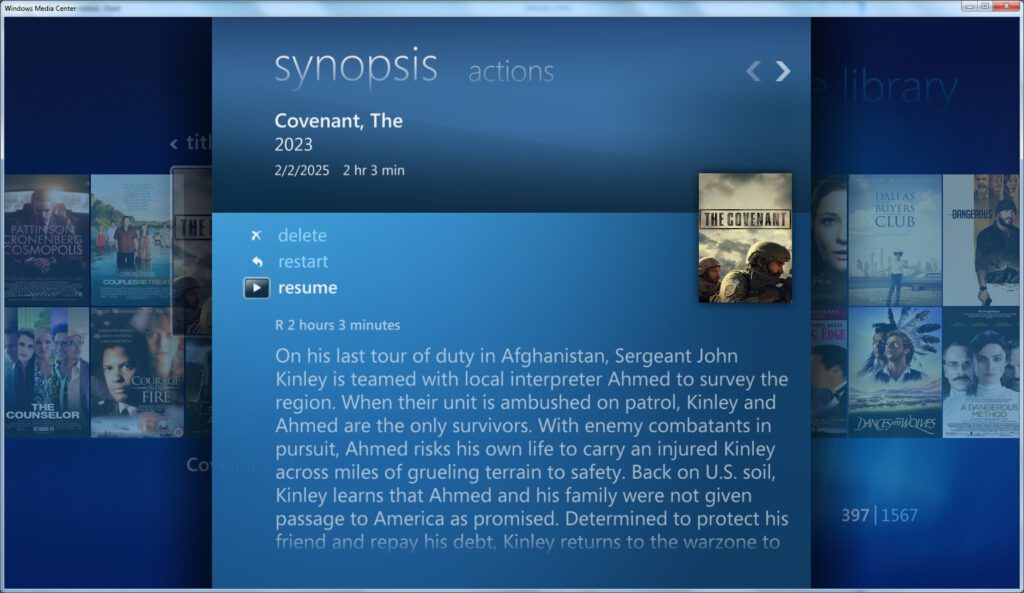
Notes:
For additional information, see the sections:
‘Metadata Utility – Adding Movie Information’ (Here).
‘Metadata Utility – How To – Path’ (Here).
‘Metadata Utility – WMC XML File(s) Generate’ (Here).
‘Metadata Utility – Download Cover Art’ (Here).
‘Metadata Utility – Description – Path – Video_TS’ (26) (Here).
Description:
Movie is shown with the ‘wrong’ Title and/or CoverArt is NOT shown.
This phenomena is even though the correct Movie / Series Information has been properly entered in Metadata Utility
AND
The necessary XML Files
AND
Media/CoverArt has been downloaded for the Movie (see documentation in the links below)
Cause:
A Title is found in the Attributes of the Media File.
This phenomena is particularly known to happen with Single Ripped files.
Note:
The Title Attribute Field should be Null/Empty –as the Metadata Information is managed through Metadata Utility for Windows Media Center–
Solution:
Edit the Attributes of the File and Delete the (false/wrong) Title in the Attributes for the File.
For Additional Information, see the documentation in the link(s) below:
Metadata Utility – Operation – Adding Movie Information (Automated) (here)
Metadata Utility – Operation – Adding Movie Information (Manually) (here)
Metadata Utility – Operation – place Record(s) in the ‘Selected Records’ Queue (here)
Metadata Utility – Operation – Bulk Import Process Master Records (BIPMR) (here)
Metadata Utility – Operation – Bulk Import Process Child Records (BIPCR) (here)
Metadata Utility – Operation – Repair (Re-Link) ‘Orphan’ Records (here)
Metadata Utility – Operation – Merge Generator (Generate Windows Media Center Metadata – XML Files) (here)
Metadata Utility – Operation – Reports (here)
Metadata Utility – Operation – Merge Generator – ‘WMC XML Profile Cache’ (here)
Metadata Utility – Operation – Merge Generator – ‘WMC XML File(s) Generate’ (here)
Metadata Utility – Operation – Merge Generator – ‘Download Cover Art’ (here)
Metadata Utility – Operation – Merge Generator – ‘XML Cache’ or ‘XML Generation’ (here)
What is the difference in Metadata Utility between: -‘Media Library’ -‘Pending’ -‘Selected’ -‘Suspect’ -‘Orphan’, ‘Last Online Search’, ‘Archive’ Records Queue? (here)
What Data, if any, can Metadata Utility delete? and or Manage? (here)
Symptoms
Every time that you open a Microsoft Office 2010 application, such as Microsoft Access 2010, you receive the following message:
Please wait while windows configures Microsoft Office Professional Plus 2010.
and/or
Microsoft Access Metadata Utility closes immediately after it is opened.
Resolution
To resolve this issue, use one or more of the following methods in the order in which they appear in:
Option 1: Install all Critical Updates for the Product (ie. Microsoft Office Professional Plus 2010).
In most cases, a critical update has not been installed, which causes Microsoft Access to go into Configuration mode each time it starts
Option 2: Microsoft Access/Office troubleshooting
If After installing all applicable critical updates, rebooted the Workstation, the issue is not resolved, then see the following article in the link below:
Symptoms
Every time that you open a Microsoft Office 2010 application, such as Microsoft Access 2010, you receive the following message:
Please wait while windows configures Microsoft Office Professional Plus 2010.
Resolution
To resolve this issue, use one or more of the following methods in the order in which they appear in:
Option 1: Install all Critical Updates for the Product (ie. Microsoft Office Professional Plus 2010).
In most cases, a critical update has not been installed, which causes Microsoft Access to go into Configuration mode each time it starts
Option 2: Microsoft Access/Office troubleshooting
If After installing all applicable critical updates, rebooted the Workstation, the issue is not resolved, then see the following article in the link below:
In short: Allows you better and easier control of the media, for example for BackUps, Migrations, etc.
In Short:
-Flexibility: much easier to run backups from an smaller share, than having one massive share with all the media in it.
-Scalability: much easier when migrations are needed, ie. moving the data of a share with less media in it, rather than one massive share with all the media in it
During the XML Generation you receive the following error:
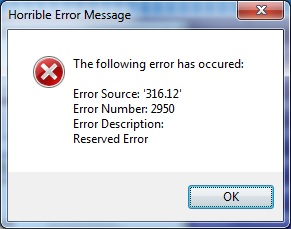
Cause:
Either Metadata Utility was installed in a custom location (outside of the default settings)
And / or
During a Batch Operation ie. XML Generation (Deletion, etc) an unexpected Network Time Out occurred and as a result the Batch Operation will terminate.
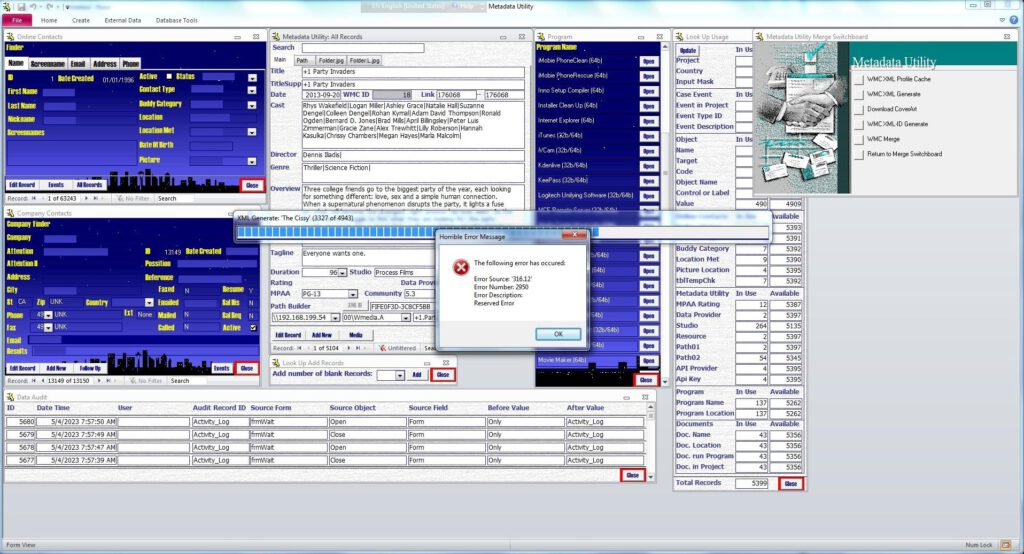
To resolve this issue, do the following:If Metadata Utility has been installed in a ‘Custom’ Configuration and thus it may have been installed in a ‘Non-Trusted’ Location, then see the Article in the link below and make sure the Path where Metadata Utility was installed is in a ‘Trusted Location’:
https://learn.microsoft.com/en-us/office/troubleshoot/access/error-running-macro
Verify the Case events on each of the records where the error was found (see suspect Queue to list all records found with an issue), and re-verify the Network Path is correct for the given Media (Movie, Series, etc) is correct and that Metadata Utility can access the Path, then, re-start the Batch Process ie. XML Generation, Deletion, etc again.
During the XML Generation you receive the following error:
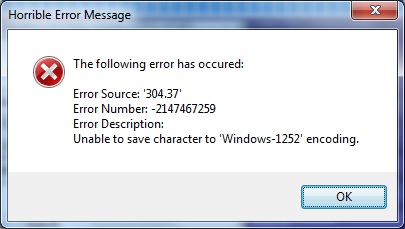
Cause: At least one, non compliant Character for XML Formatting was found.
To resolve this issue, do the following:
-Review any ‘Suspect’ Records: ‘Case Events’ may provide additional information on the cause of the Error. For additional (here)
IMPORTANT – This consideration applies to all fields in within Metadata Utility.
Avoid having problems during XML Files Generation and/or Management by avoiding any of the following in within your Metadata Utility Record(s) (Data):
-double Quotes
-Single Quotes (even single quote such as ‘Email Address’ –see the single quotes– or, It’s own… –see the apostrophe after ‘it’. In such case, use instead “it is’ instead of ‘it’s’ WITHOUT using single quotes).
-Special Characters and/or Non-English Punctuation.
Metadata Utility is mainly built for an English Character Set. That said, we have had customers that use other languages such as -not limited to, listed in no particular order–: French, German, etc who have reported no issues while using Metadata Utility, even in their own language. Having said that, we have seen, in such cases where the above listed characters are found, that during the XML File Generation, that those generated XML Files may not be always properly formatted and thus cause problems in displaying that XML Metadata Information in Windows Media Center.

Note:
Curating/Cleaning Up/QRing your Data will ensure your Data is clean and readable and it is an essential, VERY important step to ensure the later creation of your Metadata Files (XML Files) works properly without errors.
Furthermore, should you need to have a detailed Troubleshooting of your XML Generation process, then it will be crucial that the Curating/QR process has been completed. Failure to ‘QR’/Clean Up the records in Metadata Utility may result in errors during the automated XML File generation (so it is either ‘do it now’ as you are inserting/downloading the information either using the ‘Metadata Utility Online Search Tool’ and/or manually entering the Data ie. ‘Adding a Movie Manually’ yourself, or ‘do it later’ as once you encounter errors in your XML Files, such as (not limited to, listed in no particular order): missing XML File Information, Windows Media Center not displaying the Metadata Information correctly, showing duplicate/’ghost’/non-existent Movies in your Windows Media Center Library, etc), then you will be forced to troubleshoot ‘why’/’which’ Record(s) are not beeing displayed properly.

IMPORTANT
Due to the limitations in Windows Media Center, avoid having problems during XML Files Generation and/or Management by avoiding any of the following in within your Metadata Utility Record(s) (Data):
-double Quotes
-Single Quotes (even single quote such as ‘Email Address’ –see the single quotes– or, It’s own… –see the apostrophe after ‘it’. In such case, use instead “it is’ instead of ‘it’s’ WITHOUT using single quotes).
-Special Characters and/or Non-English Punctuation.
As an example, avoid special Characters, such as (not restricted or limited to, listed in no particular order):
é
ö
Ã
ó
³
Mathematical symbols (for example): ¼ € ? P Ø Ý £ £ ø ý
Non Latin Languages or Characters (for example), Crylic (Russian), Greek alphabet, Arabic, Japanesse, Chinesse, etc
During an attempt to import Bulk Master/Child Record(s) you receive the following message:
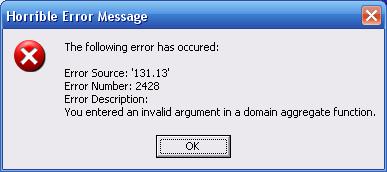
You entered an invalid argument in a domain aggregate function.
Cause: A badly formatted ‘MUWImp.xls’
For additional details See section
Metadata Utility – Operation – Bulk Import Process Master Records (BIPMR) (here)
Metadata Utility – Operation – Bulk Import Process Child Records (BIPCR) (here)
During an attempt to import Bulk Master/Child Record(s) you receive the following message:
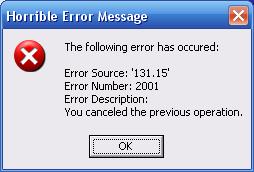
You canceled the previous operation.
Cause: An ‘invalid’ ‘MUWImp.xls’ File was used.
For additional details See section
Metadata Utility – Operation – Bulk Import Process Master Records (BIPMR) (here)
Metadata Utility – Operation – Bulk Import Process Child Records (BIPCR) (here)


MUWImp.xls Excel File contains 2 Spreadsheets:
| ztblWMC01Imp | ztblWMC02Imp |
ztblWMC02Imp – Formatting:


MasterTableID

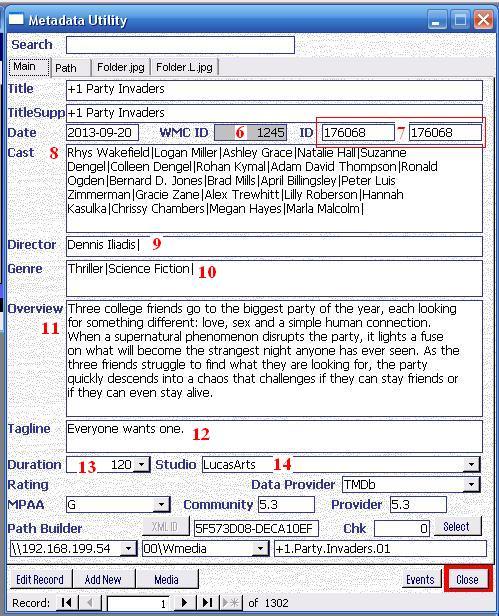
Must be the Same Value as found in ztblWMC01Imp.ID Column
Though MasterTableID must be the same as found in ztblWMC01Imp.ID Column, this value must be Unique for Medatadata Utility – This value musts not already exist in Metadata Utility.
Same as ztblWMC01Imp.ID Column, This Value must correspond to the ‘Movie’ ID in The Movie Database (TMDB).
In the Case of a Show/Series, then the ID should have the following Format:
ShowID_SXX_EYY
ShowID – TMDB’s Show ID
SXX – Season Number
EYY – Episode Number
Example
ShowID: 1234
Season: 1
Episode: 7
The MasterTableID Value in ztblWMC02Imp then should be:
1234S01E07
For additional details See section
‘Metadata Utility – Description’ – ‘WMC ID’ (6) (here)
TiTleSup

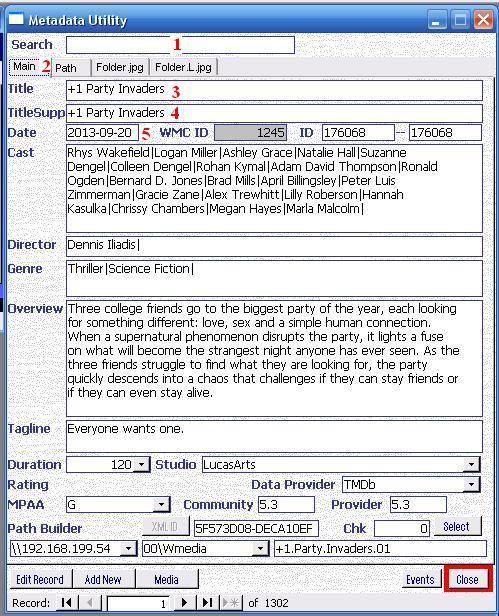
Movie or Show Title as it will be displayed in Windows Media Center
For additional details See section
‘Metadata Utility – Description’ – ‘TittleSupp’ (4) (here)
PathID01

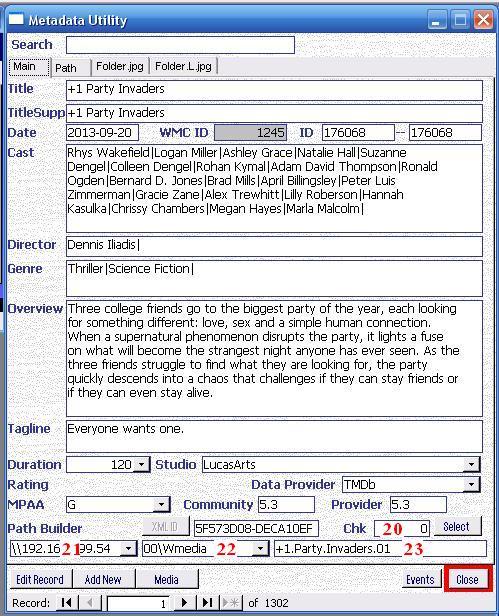

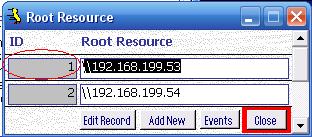
For additional details See section
‘Metadata Utility – Description’ – ‘Path Builder’ (21), (22), (23) (here)
PathID02


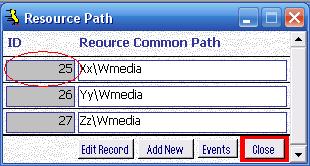
For additional details See section
‘Metadata Utility – Description’ – ‘Path Builder’ (21), (22), (23) (here)
Path03


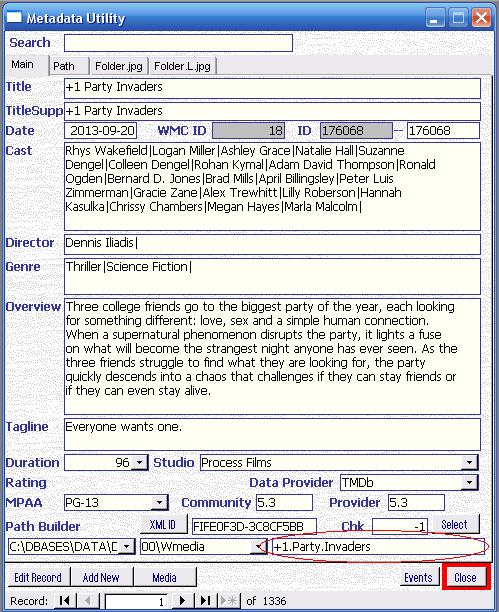
For additional details See section
‘Metadata Utility – Description’ – ‘Path Builder’ (21), (22), (23) (here)


MUWImp.xls Excel File contains 2 Spreadsheets:
| ztblWMC01Imp | ztblWMC02Imp |
ztblWMC01Imp – Formatting:


ID


Must be Unique – This value can not already exist / be found in Metadata Utility.
This Value must correspond to the ‘Movie’ ID in The Movie Database (TMDB).
In the Case of a Show/Series, then the ID should have the following Format:
ShowID_SXX_EYY
ShowID – TMDB’s Show ID
SXX – Season Number
EYY – Episode Number
Example
ShowID: 1234
Season: 1
Episode: 7
The ID Value in ztblWMC01Imp then should be:
1234S01E07
For additional details See section
‘Metadata Utility – Description’ – ‘WMC ID’ (6) (here)
Title


Movie or Show Title
For additional details See section
‘Metadata Utility – Description’ – ‘Title’ (3) (here)
Year


YYYY-MM-DD
Example
2001-12-14
For additional details See section
‘Metadata Utility – Description’ – ‘Date’ (5) (here)
Cast


Should have the 20 Most Popular Cast Members.
For additional details See section:
‘Metadata Utility – Description’ – ‘Cast’ (8) (here)
‘Metadata Utility – Operation – Adding Movie Information (Automated)’ for proper Formatting and special characters to avoid (here).
Director


For additional details See section
‘Metadata Utility – Description’ – ‘Director’ (9) (here)
‘Metadata Utility – Operation – Adding Movie Information (Automated)’ for proper Formatting and special characters to avoid (here).
Genre


For additional details See section
‘Metadata Utility – Description’ – ‘Genre’ (10) (here)
‘Metadata Utility – Operation – Adding Movie Information (Automated)’ for proper Formatting and special characters to avoid (here).
Overview


For additional details See section
‘Metadata Utility – Description’ – ‘Overview’ (11) (here)
‘Metadata Utility – Operation – Adding Movie Information (Automated)’ for proper Formatting and special characters to avoid (here).
Tagline


For additional details See section
‘Metadata Utility – Description’ – ‘Tagline’ (12) (here)
‘Metadata Utility – Operation – Adding Movie Information (Automated)’ for proper Formatting and special characters to avoid (here).
Duration


In Minutes
For additional details See section
‘Metadata Utility – Description’ – ‘Duration’ (13) (here)
Studio ID


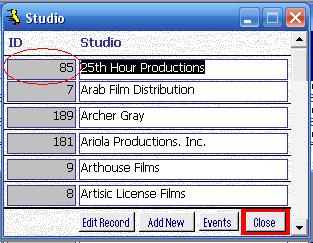
Must be the Studio-ID Found in Metadata Utility.
Make sure the Studio ID has already been entered in Metadata Utility
For additional details See section
‘Metadata Utility – Description’ – ‘Studio’ (14) (here)
To add, edit Studio(s):
Metadata Utility – How To – Initial SetUp – Studio (here)
Data Provider ID

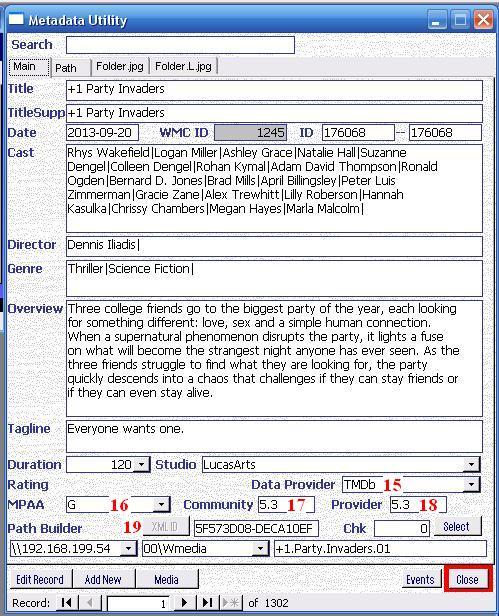
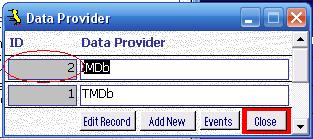
Must be the Data Provider ID Found in Metadata Utility.
Make sure the Data Provider ID has already been entered in Metadata Utility
For additional details See section
‘Metadata Utility – Description’ – ‘Data Provider’ (15) (here)
To add, edit Data Provider ID(s):
Metadata Utility – How To – Initial SetUp – Data Provider (here)
MPAARatingID


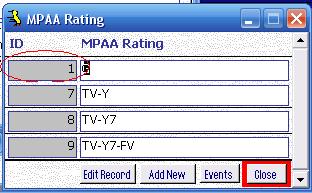
Must be the MPAA Rating ID Found in Metadata Utility.
Make sure the MPAA Rating ID has already been entered in Metadata Utility
For additional details See section
‘Metadata Utility – Description’ – ‘MPAA Rating’ (16) (here)
To add, edit MPAA Rating ID(s):
Metadata Utility – How To – Initial SetUp – MPAA Rating (here)
Rating


Value given
For Example
7.6
For additional details See section
‘Metadata Utility – Description’ – ‘Community Rating’ (17) (here)
Provider Rating


Value given
For Example
7.3
For additional details See section
‘Metadata Utility – Description’ – ‘Provider Rating’ (18) (here)
Poster_Path

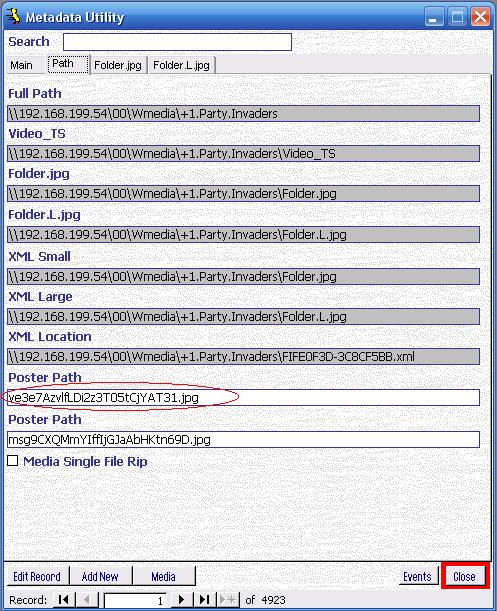
Name of the jpg file that you whish to have it displayed in Windows Media Center
Example:
Filename_Here.jpg
For additional details See section
‘Metadata Utility – Description’ – ‘Path’ – ‘Poster Path’ (30b) (here)
Backdrop_Path

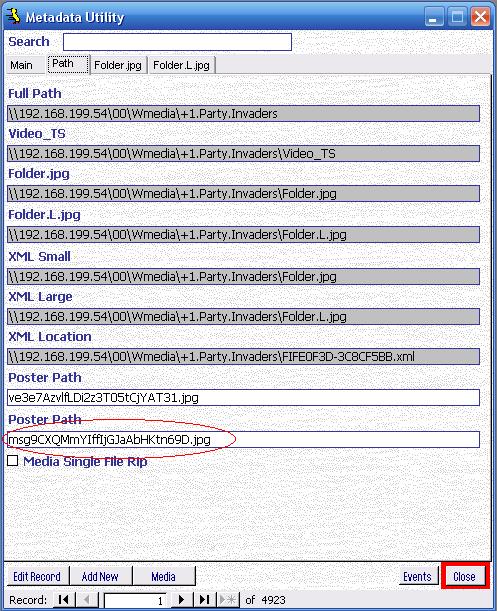
Name of the jpg file
Example:
Filename_Here.jpg
For additional details See section
‘Metadata Utility – Description’ – ‘Path’ – ‘Poster Path’ (30c) (here)
Metadata Utility’s Shortcut Option are as follows:
| Command Title | Open | Command Syntax |
| W01 – Metadata Utility | Metadata Utility | /cmd W01 |
| W02 – Company Contacts | Company Contacts | /cmd W02 |
| W03 – Online Contacts | Online Contacts | /cmd W03 |
| W99 – Admin | Online Contacts Company Contacts Metadata Utility Programs Look Up Usage Add Records Data Audit | /cmd W99 |
Syntax:
“Full_Path_to_Miscrosoft_Access_32_Bit” “Full_Path_for_Metadata_Utility” “/cmd CommandOptionHere”
To configure any of the above advanced Start-Up options:
-right click on the Metadata Utility Shortcut and select ‘Properties’
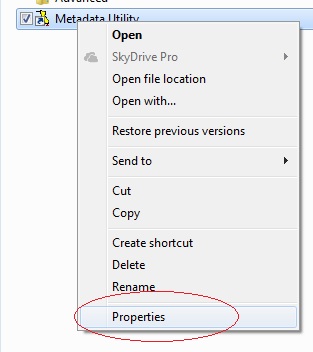
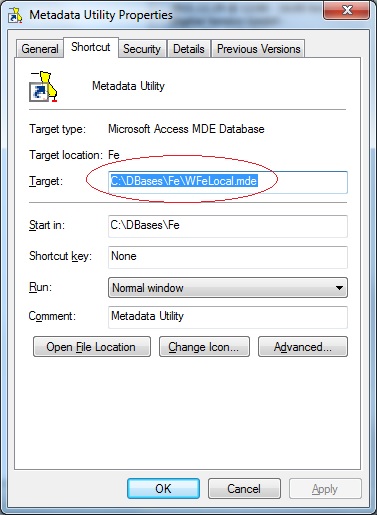
-in the ‘Target’ Section add the Full Path for Microsoft Access
In the Example below, we are using Microsoft 2010 32 bit
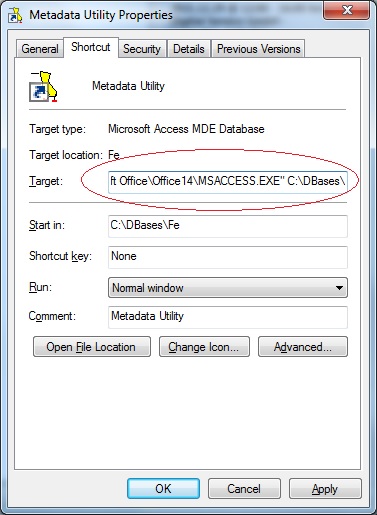
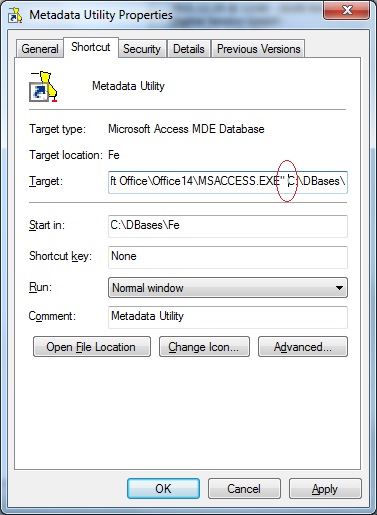
Note:
Enclose Microsoft Access Full Path in double Quotes
Make sure there is a space between Microsoft Access Full Path and Metadata Utility’s Full Path
Metadata Utility requires Microsoft Access 32 Bit
-Enclose Metadata Utility’s Path in double Quotes
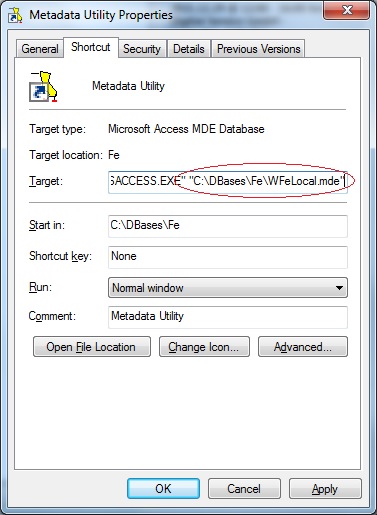
Note:
Make sure there is a space between Microsoft Access 32 Bit (Full Path) and Metadata Utility (Full Path)
-Add the desire Command (see above table).
For this example, we are adding the ‘Admin’ Command
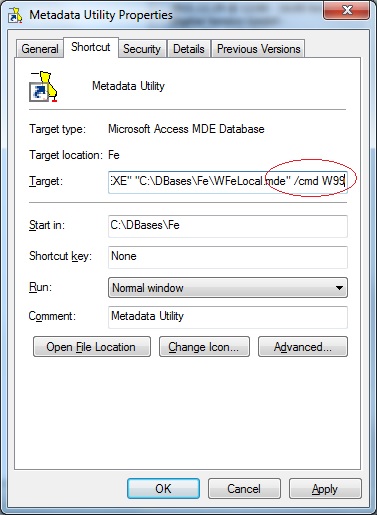
Note:
Make sure there is a space between Metadata Utility (Full Path) and the command
Make sure there is a space between /cmd CommandHere
Double check to make sure there is a space between the full path for Microsoft Access 32 Bit and the full path to Metadata Utility and the advanced command and as well a space between the command /cmd and the actual command option.
Example of the full Value that should be found in the ‘Target’ section in the Shortcut for Metadata Utility, including the Command Option (in the example below using using Microsoft Access 2010 32 Bit):
“C:\Program Files (x86)\Microsoft Office\Office14\MSACCESS.EXE” “C:\DBases\Fe\WFeLocal.mde” /cmd W99
In the above example, Metadata Utility is using a path to Microsoft Access 2010 32 Bit. As described on the Command Options Table ‘W99’ (without the single quotes) will automatically open each time Metadata Utility is opened, regardless of which user is logged on and regardless if there is a Profile defined in within Metadata Utility, the following Windows:
Online Contacts
Company Contacts
Metadata Utility
Programs
Look Up Usage
Add Records
Data Audit
For more information on how to create a ‘Profile’ in Metadata Utility see ‘StartUp Management’ click here
For more information of the minimum requirements for Metadata Utility click here
After a Media Data Migration (ie. from a Share to another Share, From one NAS to another NAS, etc) and after updating the information in Metadata Utility and Generating NEW XML Files and synchronizing them with Windows Media Center some of the following issues are seen:
-Album Covers are NOT shown and/or
-When clicked in Windows Media Center, a Message is displayed that Windows Media Center ‘cannot find the movie in the DVD drive’ (even though the Media ie. Movie, Series, etc) resides on a Share Partition (or NAS Share Partition).
Cause:
-Windows Media Center is still using/looking for the Media on the ‘old’ location, prior to the migration.
-Information has not been properly update in Medata Utility
To resolve this issue, do the following:
- Verify the new location has been updated in Meatadata Utility
See section: Metadata Utility – Description – ‘Path’ (click here) - For advanced users:
see section: Metadata Utility – Operation – Bulk Update Process (BUP) (click here)
Once completed, then follow each of the steps as described in section: Metadata Utility – Operation – Reports (click here)
Additional Information:
Metadata Utility – How To – Movie CoverArt (Thumbnail ‘Folder.L.jpg’) Verification (click here)
Metadata Utility – How To – Movie CoverArt (Thumbnail ‘Folder.jpg’) Verification (click here)
Error 2220 – Can’t see Coverart (Folder.jpg/Folder.L.jpg) (click here)
Windows Media Center Coverart (click here)
Metadata Utility – Operation – Bulk Update Process (BUP) (click here)
Metadata Utility – Case Studies – Managing Data Migration(s) from ‘Old’ (Source) location to a ‘New’ (Target) Location (click here)
see section ‘Media Single File Rip’ (30d) (click here)
Back-End Name Database Back End Full Path Database Back End Template Full Path WBe01.mde C:\DBases\Data\WBe01.mde C:\DBases\Data\MsSQL\BACKUP\WBe01T.mde WBe02.mde C:\DBases\Data\WBe02.mde C:\DBases\Data\MsSQL\BACKUP\WBe02T.mde WBe03.mde C:\DBases\Data\WBe03.mde C:\DBases\Data\MsSQL\BACKUP\WBe03T.mde WBe04.mde C:\DBases\Data\WBe04.mde C:\DBases\Data\MsSQL\BACKUP\WBe04T.mde WBe05.mde C:\DBases\Data\WBe05.mde C:\DBases\Data\MsSQL\BACKUP\WBe05T.mde WBe06.mde C:\DBases\Data\WBe06.mde C:\DBases\Data\MsSQL\BACKUP\WBe06T.mde WBe07.mde C:\DBases\Data\WBe07.mde C:\DBases\Data\MsSQL\BACKUP\WBe07T.mde WBe08.mde C:\DBases\Data\WBe08.mde C:\DBases\Data\MsSQL\BACKUP\WBe08T.mde WBe09.mde C:\DBases\Data\WBe09.mde C:\DBases\Data\MsSQL\BACKUP\WBe09T.mde WBe10.mde C:\DBases\Data\WBe10.mde C:\DBases\Data\MsSQL\BACKUP\WBe10T.mde WBe11.mde C:\DBases\Data\WBe11.mde C:\DBases\Data\MsSQL\BACKUP\WBe11T.mde WBe12.mde C:\DBases\Data\WBe12.mde C:\DBases\Data\MsSQL\BACKUP\WBe12T.mde WBe13.mde C:\DBases\Data\WBe13.mde C:\DBases\Data\MsSQL\BACKUP\WBe13T.mde WBe14.mde C:\Dbases\Data\WBe14.mde C:\Dbases\Data\MsSQL\BACKUP\WBe14T.mde WBe50.mde C:\Dbases\Data\WBe50.mde C:\Dbases\Data\MsSQL\BACKUP\WBe50T.mde WBe51.mde C:\Dbases\Data\WBe51.mde C:\Dbases\Data\MsSQL\BACKUP\WBe51T.mde WBe52.mde C:\Dbases\Data\WBe52.mde C:\Dbases\Data\MsSQL\BACKUP\WBe52T.mde WBe53.mde C:\Dbases\Data\WBe53.mde C:\Dbases\Data\MsSQL\BACKUP\WBe53T.mde WBe54.mde C:\Dbases\Data\WBe54.mde C:\Dbases\Data\MsSQL\BACKUP\WBe54T.mde WBe55.mde C:\Dbases\Data\WBe55.mde C:\Dbases\Data\MsSQL\BACKUP\WBe55T.mde WBe56.mde C:\Dbases\Data\WBe56.mde C:\Dbases\Data\MsSQL\BACKUP\WBe56T.mde WBe57.mde C:\Dbases\Data\WBe57.mde C:\Dbases\Data\MsSQL\BACKUP\WBe57T.mde WBe58.mde C:\Dbases\Data\WBe58.mde C:\Dbases\Data\MsSQL\BACKUP\WBe58T.mde WBe59.mde C:\Dbases\Data\WBe59.mde C:\Dbases\Data\MsSQL\BACKUP\WBe59T.mde WBe60.mde C:\Dbases\Data\WBe60.mde C:\Dbases\Data\MsSQL\BACKUP\WBe60T.mde WBe98.mde C:\DBases\Data\WBe98.mde C:\DBases\Data\MsSQL\BACKUP\WBe98.mde WBe99.mde C:\DBases\Data\WBe99.mde C:\DBases\Data\MsSQL\BACKUP\WBe99T.mde
Note:
-Any Advanced Template Files should be downloaded and stored into this location C:\DBases\Data\DbDocs
Front-End File(s):
C:\DBases\Fe
WFeLocal.mde
Metadata Utility Full Version Metadata Utility Update Version First time installation, including a sample of the most common Settings as well as a sample Movie listing. For existing installations of Metadata Utility. This installation package will install a brand new version of Metadata Utility (including all BackEnds*). Existing users with an existing Metadata Utility installation must refrain from using this installer as running this installer will overwrite any existing BackEnds (if found). Use this version if you already have a Built-in Database of all your movies.
*BackEnds= Location(s) where the Data is stored.
For more information about Metadata Utility’s BackEnds clickhere
For more information about Metadata Utility’s Installation clickhere
Download the Application (and/or applicable File ie. ‘BackEnd’)
-Exit our of Metadata Utility (applicable for upgrade on existing installations) -Download the appropriate Package (either Metadata Utility Full Version or Metadata Utility Update Version) to your Desktop. -After the download has completed, then -Right click on the downloaded file and select ‘Properties’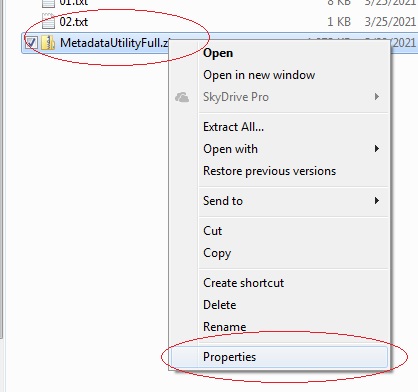
-Click on ‘Unlock’
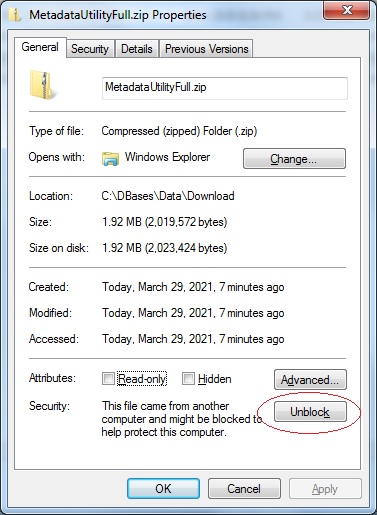
-Click on ‘Apply’
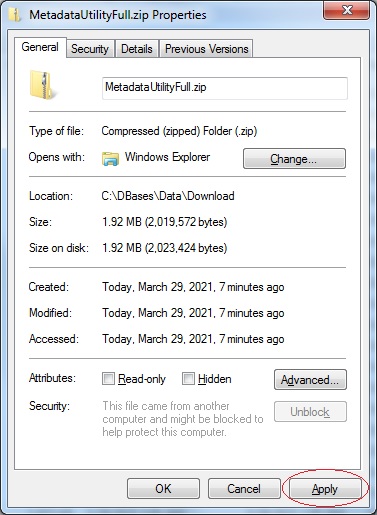
-Click on ‘Ok’ to Close the Properties dialog for the downloaded file
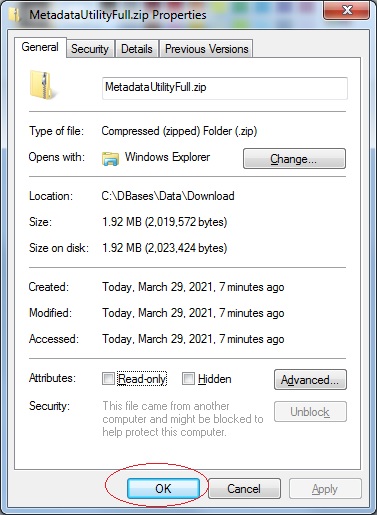
-After the download has completed, extract the contents of the Zip file (either double click on the file or right mouse click on the file and select ‘extract’).
Automated Installation
-Double click to run the Installer (EXE) file.
-Follow the Installer Wizard Prompts.
-Once completed, click ‘Finish’ to launch Metadata Utility.
Manual Installation – Advanced Users Only
-Move the extracted File(s) to the appropriate location:
BackEnd Files Default Location
BackEnd-Template Files Default Location
C:DBasesData
C:DBasesDataMsSQLBACKUP
-Once completed, launch Metadata Utility.
For more information about Metadata Utility’s BackEnds clickhere
Keywords:
-Update to enable TLS 1.1 and TLS 1.2 as default secure protocols in WinHTTP in Windows
-SSL
-TLS
-KB3140245
-WinHTTP
Cause: TLS must be at least on Version 1.2
Solution:
Make sure the following Microsoft Update/patch is installed:
After the update has been installed (a re-boot is mandatory for the changes to take effect), make sure that you verify that the registry settings have been update as described in the Microsoft website documentation as seen in the provide link (see immediately above), especially the following:
-Update/patch has been installed
-Machine has been rebooted
-Registry Key(s) verification:
The DefaultSecureProtocols registry entry can be added in the following path:
HKEY_LOCAL_MACHINE\SOFTWARE\Microsoft\Windows\CurrentVersion\Internet Settings\WinHttp
On x64-based computers, DefaultSecureProtocols must also be added to the Wow6432Node path:
HKEY_LOCAL_MACHINE\SOFTWARE\Wow6432Node\Microsoft\Windows\CurrentVersion\Internet Settings\WinHttp
The registry value is a DWORD bitmap. The value to use is determined by adding the values corresponding to the protocols desired.
| DefaultSecureProtocols Value | Protocol enabled |
| 0x00000008 | Enable SSL 2.0 by default |
| 0x00000020 | Enable SSL 3.0 by default |
| 0x00000080 | Enable TLS 1.0 by default |
| 0x00000200 | Enable TLS 1.1 by default |
| 0x00000800 | Enable TLS 1.2 by default |
Make absolutely sure, that the value in Registry is at least as follows:
Take the value for TLS 1.1 (0x00000200) and the value for TLS 1.2 (0x00000800), then add them together in calculator (in programmer mode), and the resulting registry value would be 0x00000A00.
During Metadata Download you receive the following message:
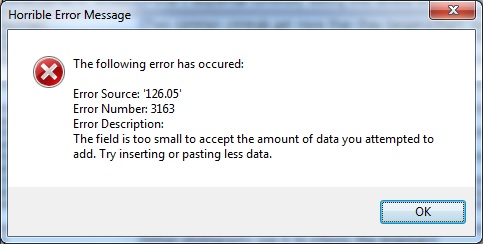
The field is too small to accept the ammount of data you attemped to add. Try insterting or pasting less data.
Cause: depending on the ammount of Data (ie. Movies searched/downloaded), network traffic, internet speed connection and a different subset/combination of factors, Metadata Utility will display such a message when the Data beeing transmitted experiences a Timeout.
To resolve this issue, do the following:
-Perform a more concise search for the Movie in question. For Example, Search for ‘007 Dr. No’ (without the single Quotes) instead of ‘Dr. No’ (still without the single Quotes)
During Metadata Download you receive the following message:
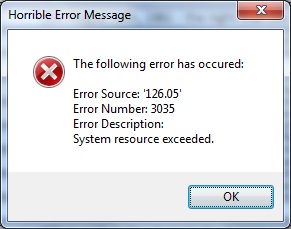
System Resources Exeeded
Cause: depending on the ammount of Data (ie. Movies searched/downloaded), network traffic, internet speed connection and a different subset/combination of factors, Metadata Utility will display such a message when the Data beeing transmitted experiences a Timeout.
To resolve this issue, do the following:
-Perform a more concise search for the Movie in question. For Example, Search for ‘007 Dr. No’ (without the single Quotes) instead of ‘Dr. No’ (still without the single Quotes)
After completing an update to a new version and/or an incorrect shutdown, ie. Metadata Utility was abnormally closed you receive the following error:

Cause: After an Upgrade and/or an incorrect shutdown, ie. Metadata Utility was abnormally closed which may cause BackEnd(s) to be left in an improper shutdown stage.
To resolve this issue, do the following:
-Exit Properly out of ‘Metadata Utility’ using the Exit Button (Main Switchboard)
-If ‘Metadata Utility’ is installed in a Network environment, make sure no other users are currently connected to any of the BackEnds, then
-Open ‘Metadata Utility’ again (‘Metadata Utility’ will automatically attempt to repair any BackEnds that may have been improperly closed).
-Windows 7 (32 or 64 Bit ) or later.
-Microsoft Access 2010 32 Bit (or later), Full Version or Runtime Version.
-Microsoft Office SP2 (or later) and/or Microsoft Access Runtime 2010 32 Bit SP2 (or later)
-Internet Connection.
-Read and Write rights on each location where the movies/series are located
-Regardless of the Operating System (32 or 64 Bit Version of Windows), Metadata Utility requires a 32 Bit Version of Microsoft Access (or Microsoft Access Runtime) to run.
-For those Microsoft Office (or Microsoft Access) 64 Bit installations: It is possible to install and run parallel a 32 Bit Version of either Microsoft Office or Microsoft Access (or Microsoft Access Runtime). For example:
On a Microsoft Office/Access 2010 64 Bit installation, you can install Microsoft Office or Microsoft Access or Microsoft Access Runtime 2016 or 365 32 Bit.
On a Microsoft Office/Access 2016 64 Bit installation, you can install Microsoft Office or Microsoft Access or Microsoft Access Runtime 2010 or 365 32 Bit.
In other words, you can install a 32 Bit Version of Microsoft Office/Microsoft Access/Microsoft Access Runtime parallel to the 64 Bit Version so as long as it is a different Version than the current 64 Bit Version installation of Microsoft Office/Access/Access Runtime. If you don’t own a license for Microsoft Office, or Microsoft Access, then Microsoft Access Runtime is the way to go.
Microsoft Access Runtime Download
We strongly recommend all users to only download and install Microsoft Access Runtime directly from Microsoft. For convenience we are including the links for Microsoft Access 2010 Runtime Download as well as Microsoft Access 2010 Runtime Service Pack 02 Download:
Microsoft Access 2010 Runtime
https://www.microsoft.com/en-us/download/details.aspx?id=10910
Make always sure that the Version installed is the 32 Bit Version (x86 Installer) as Metadata Utility requires a 32 Bit Version of Microsoft Access (2010 or later)
Service Pack 2 for Microsoft Access 2010 Runtime (KB2687444) 32-Bit Edition
https://www.microsoft.com/en-us/download/details.aspx?id=39643
Note:
-If Any of the above minimum requirements is missing/are not met, then Metadata Utility (even the latest Version of Metadata Utility) will run in ‘Legacy Mode’.
-Some features may NOT be available while Metadata Utility is running in Legacy Mode.
-What Features are available for Free and which are available with a license?
See Metadata Utility Free vs License Comparison click here.
During an attempt to install MsOffice 2010 you receive an Error:
‘MsOffice 2010 Error 1402 setup cannot open the registry key Unknown\components’.

To resolve this issue, do the following:
-Microsoft Office 2010 FixIt Tool
-Download and Install ‘Microsoft Office 2010 FixIt Tool’ to remove any left over components from a prior MsOffice installation and/or repair the registry.
https://support.microsoft.com/en-us/office/repair-an-office-application-7821d4b6-7c1d-4205-aa0e-a6b40c5bb88b?ocmsassetid=ha010357402&ctt=1&correlationid=8bfaf910-6d5f-4252-b5bb-0ed67d5d4349&ui=en-us&rs=en-us&ad=us
-Run Tool to remove MsOffice 2010 completely. Once completed (PC will need to be rebooted after the tool is finished with the cleanup/deinstallation), then
-Reboot PC after MsOffice 2010 removal has been completed (this step is very important), then
-After CleanUp Tool has been completed (ie. MsOffice has been uninstalled and PC has been rebooted), then
-Open the Command Prompt (Admin rights) (ie. Start – Run – Cmd – Ok (click))
-Copy and paste the following Command:
secedit /configure /cfg %windir%\inf\defltbase.inf /db defltbase.sdb /verbose
-Once the command has completed running (you will see the DOS Command Prompt back to the C:\ Prompt, then
-Install MsOffice 2010 again, then
-Install Language Packs (if needed), then
-Install the latest Service Pack ie. Service Pack 1, Service Pack 2, etc
During an attempt to install the latest Service Pack, you receive a Message:
‘Microsoft Access 2010 32 Bit Service Pack an Error occurred during the detection’ or ‘Setup detected legacy groove’, then the installation fails/terminates
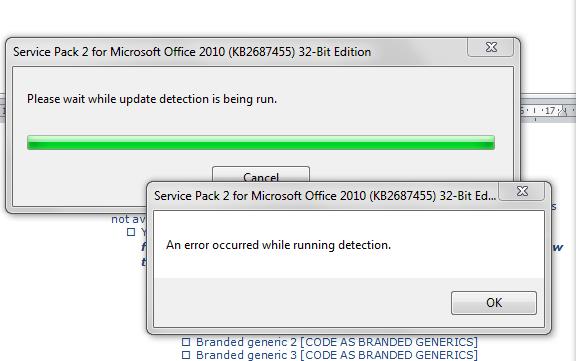
Solution:
-Repair MsAccess/Office Installation
-If unable (due to Error 2424, 2425, or repair fails), then
-Microsoft Office 2010 FixIt Tool
-Download and Install ‘Microsoft Office 2010 FixIt Tool’
https://support.microsoft.com/en-us/office/repair-an-office-application-7821d4b6-7c1d-4205-aa0e-a6b40c5bb88b?ocmsassetid=ha010357402&ctt=1&correlationid=8bfaf910-6d5f-4252-b5bb-0ed67d5d4349&ui=en-us&rs=en-us&ad=us
-Run Tool to remove MsOffice 2010 completely. Once completed (PC will need to be rebooted after the tool is finished with the cleanup/deinstallation), then
-Reboot PC after MsOffice 2010 removal has been completed (this step is very important), then
-Install MsOffice 2010 again, then
-Install Language Packs (if needed), then
-Install the latest Service Pack ie. Service Pack 1, Service Pack 2, etc
‘Metadata Utility’ fails to open and you receive the following message:
‘The expression you entered has a function name that Microsoft Access can’t find’
‘The expression you entered has a function name that database can’t find’

Solution:
Latest Service Pack is needed (ie. Service Pack 2 (SP2) or later needed)
‘Metadata Utility’ fails to open and you receive the following message:
‘The expression you entered has a function name that Microsoft Access can’t find’
‘The expression you entered has a function name that database can’t find’

Solution:
Latest Service Pack is needed (ie. Service Pack 2 (SP2) or later needed)
Metadata Utility Feature Free Version Licensed Version -Build Movie Library Manually Yes Yes -Build Movie Library Automatically No Yes* -Build Show Library Automatically (Beta Version Testing) No Yes* -Edit Movie Library Yes Yes -Online Contacts Access Yes Yes -Company Contacts Access Yes Yes -Manage Studios List Yes Yes -Manage Data Provider List Yes Yes -Manage MPAA Categories List Yes Yes -Manage Path Builder 01 List Yes Yes -Manage Path Builder 02 List Yes Yes -Media Library Queue Access Yes Yes -Pending Records Queue Access Yes Yes -Selected Records Queue Access Yes Yes -Suspect Records Queue Access Yes Yes -Orphan Records Queue Access Yes Yes -All Media Library Queue Access Yes Yes -Applying Filters (Advanced Feature) Yes Yes -Advanced Search Yes Yes -Download Cover-Art No Yes -Migrate/Consolidate Movie Library (Advanced Feature) No Yes -Media Path Verification (Advanced Feature) No Yes -Advanced Reporting (Advanced Feature) No Yes -XML Batch Processing (Advanced Feature) No Yes -XML Cache to Local Profile (Advanced Feature) No Yes -XML Generate new XML Files (Advanced Feature) No Yes -XML Advanced Merge Troubleshooting (Advanced Feature) No Yes -XML ID Verification (Advanced Feature) No Yes -Folder.jpg Verification (Advanced Feature) No Yes -Folder.L.jpg Verification (Advanced Feature) No Yes -Select All Records (Batch-Processing) (Advanced Feature) No Yes -Un-Select All Records (Batch-Processing) (Advanced Feature) No Yes -Automatic Logging of known Errors and Flagging Records during Batch Processing No Yes -Application Launcher (Advanced Feature) (Advanced Feature) No Yes
Metadata Utility
*’Metadata Utility – Online Search Tool’ requires a Valid API Management Key. For more information, see Q&A section ‘The Movie Database (TMDb) API Key – Why is needed?’ click here.
Metadata Utility comes with an already pre-built List of the Reports, Forms, Controls such as Labels, Buttons, etc that area available for control.
In such case, that the values were deleted from the List (instead of deactivated, the user deleted the values all together), then we are providing with the List so that the List may be manually re-entered.
The below list includes a sample of the Controls –Objects such as Reports, Forms, Labels, Controls, Buttons– that are available to manage as well as a ‘sample’ value for the corresponding control.
Note that it is NOT necessary for this feature to be enabled in order to get the ‘default’ Naming conventions in Metadata Utility. This List is for convenience in such case, in which a User whishes to change the default displayed Name of a particular Report, Form, Label, Button, etc.
| Object Name | Control Name | Value (which you can change to your language and/or choice to display instead) |
| Case Events | Descriptionlbl | Description W |
| Case Events | cmdCloseBtn | Close W |
| Case Events | EventTypelbl | Type |
| Case Events | EventDatelbl | Date |
| Case Events | FormCaption | Case Events W |
| Case Events | cmdAddEventBtn | Add |
| Case Events Add | cmdSaveEventBtn | Upload |
| Case Events Add | Label00 | Category |
| Case Events Add | FormCaption | Case Events Add W |
| Case Events Add | cmdCancelBtn | Close |
| Company Contacts | EmailLbl | |
| Company Contacts | StLbl | ST |
| Company Contacts | CoFinderLbl | Search |
| Company Contacts | CompanyLbl | Co. |
| Company Contacts | AttentionLbl | Att. |
| Company Contacts | PossitionLbl | Pos. |
| Company Contacts | AddressLbl | Adr. |
| Company Contacts | DateCreatedLbl | Date |
| Company Contacts | ZipLbl | ZIP |
| Company Contacts | CountryLbl | Ctry. |
| Company Contacts | PhoneLbl | Ph. |
| Company Contacts | FormCaption | Company Contacts |
| Company Contacts | FaxLbl | Fx. |
| Company Contacts | cmdEventsBtn | Event |
| Company Contacts | AttentionIILbl | Att. II |
| Company Contacts | ExtLbl | X |
| Company Contacts | SalHisLbl | His. |
| Company Contacts | cmdAddNewBtn | New |
| Company Contacts | FaxedLbl | Fxd. |
| Company Contacts | EmailedLbl | Em. |
| Company Contacts | MailedLbl | Ma. |
| Company Contacts | ResultsLbl | Note |
| Company Contacts | ResumeLbl | CV. |
| Company Contacts | CityLbl | Ct. |
| Company Contacts | SalReqLbl | Req. |
| Company Contacts | ActiveLbl | Act? |
| Company Contacts | ReferenceLbl | Ref. |
| Company Contacts | cmdEditBtn | Edit |
| Company Contacts | IDLbl | id |
| Company Contacts | cmdCloseBtn | Bye |
| Company Contacts | CalledLbl | Ca. |
| Data Audit | SourceObject02Lbl | Object |
| Data Audit | AuditRecordIDLbl | Audit Rec. ID |
| Data Audit | SourceObject01Lbl | Form Source |
| Data Audit | UserLbl | Usr. |
| Data Audit | EditDateTimeLbl | Date Time |
| Data Audit | FormCaption | Data Audit W |
| Data Audit | BeforeValueLbl | Before |
| Data Audit | IDLbl | id |
| Data Audit | cmdCloseBtn | Bye |
| Data Audit | AfterValueLbl | After |
| Data Audit | SourceFieldLbl | Field |
| Date | DateLbl | Date W |
| Date | cmdRunBtn | Open |
| Date | FormCaption | Date W |
| Date | cmdCloseBtn | Bye |
| Date Range | cmdRunBtn | Open |
| Date Range | Date02Lbl | End |
| Date Range | FormCaption | Date Range W |
| Date Range | Date01Lbl | Str. |
| Date Range | cmdCloseBtn | Close |
| Documents | DocNamelbl | Name W |
| Documents | DocPathlbl | Path W |
| Documents | FormCaption | Docs W |
| Documents | cmdCloseBtn | Bye |
| Documents | cmdOpenBtn | Run |
| Documents | ProgramIDLbl | Run by Pgrm. |
| Documents | ProjectLbl | Prj. |
| Documents | IDLbl | id |
| Exit | FormCaption | Exit |
| Exit | ExitButton | Bye, Bye… |
| License Manager | FormCaption | Lizenz Verwaltung |
| License Manager | Label0 | Lizenz Verwaltung |
| License Manager | Label12 | Aktion |
| License Manager | Label18 | Bereits Aktiviert |
| License Manager | Label11 | Lizenz Schluessel |
| License Manager | Label20 | Emailaddresse |
| License Manager | Label6 | Aktivierten (HardwareID) |
| License Manager | Label13 | Dein HardwareID: |
| License Manager | Label16 | Bitte waehlen ein HardwareID zum deaktivieren |
| License Manager | btnActivate | Aktivieren |
| License Manager | cmdCloseBtn | Bye |
| Look Up Add Records | cmdCloseBtn | Bye |
| Look Up Add Records | Label00 | Add |
| Look Up Add Records | cmdAddBtn | Run |
| Look Up Add Records | FormCaption | Look Up Add Records W |
| LookUp 01 | FormCaption | Look Up 01 |
| LookUp 01 | cmdCloseBtn | Bye |
| LookUp 01 | cmdEditBtn | Edt. |
| LookUp 01 | cmdEventsBtn | Evt. |
| LookUp 01 | cmdAddNewBtn | New |
| LookUp 02 | cmdEditBtn | Edt. |
| LookUp 02 | cmdAddNewBtn | New |
| LookUp 02 | cmdEventsBtn | Evt. |
| LookUp 02 | cmdCloseBtn | Bye |
| LookUp 02 | FormCaption | Look Up 02 |
| LookUp 03 | cmdEventsBtn | Evt. |
| LookUp 03 | cmdAddNewBtn | New |
| LookUp 03 | FormCaption | Look Up 03 |
| LookUp 03 | cmdEditBtn | Edt. |
| LookUp 03 | cmdCloseBtn | Bye |
| LookUp 04 | cmdEditBtn | Edt. |
| LookUp 04 | cmdEventsBtn | Evt. |
| LookUp 04 | ActiveLbl | Act? |
| LookUp 04 | cmdAddNewBtn | New |
| LookUp 04 | cmdCloseBtn | Bye |
| LookUp 04 | FormCaption | Look Up 04 |
| LookUp 05 | cmdEventsBtn | Evt. |
| LookUp 05 | cmdCloseBtn | Bye |
| LookUp 05 | FormCaption | Look Up 05 |
| LookUp 05 | cmdAddNewBtn | New |
| LookUp 05 | cmdEditBtn | Edt. |
| LookUp 05 | ActiveLbl | Act? |
| LookUp 06 | cmdEditBtn | Edt. |
| LookUp 06 | cmdAddNewBtn | New |
| LookUp 06 | cmdEventsBtn | Evt. |
| LookUp 06 | cmdCloseBtn | Bye |
| LookUp 06 | FormCaption | Look Up 06 |
| LookUp 07 | FormCaption | Look Up 07 |
| LookUp 07 | ActiveLbl | Act? |
| LookUp 07 | btnActivate | Aktivieren |
| LookUp 07 | cmdEditBtn | Edt. |
| LookUp 07 | cmdAddNewBtn | New |
| LookUp 07 | cmdEventsBtn | Evt. |
| LookUp 07 | cmdCloseBtn | Bye |
| LookUp Usage | CaseEventLbl | Case_Event_W |
| LookUp Usage | PictureLocationLbl | Pic_Loc. |
| LookUp Usage | EventInProjectLbl | Event_by_Project |
| LookUp Usage | Available04Lbl | Avail_04 |
| LookUp Usage | InUse02Lbl | Use_02 |
| LookUp Usage | EventTypeLbl | Event_Desc. |
| LookUp Usage | InputMaskLbl | Input_Mask_W |
| LookUp Usage | CountryLbl | Country_W |
| LookUp Usage | ProjectLbl | ProjectLbl |
| LookUp Usage | InUse01Lbl | Using |
| LookUp Usage | ObjectLbl | Obj. |
| LookUp Usage | ControllLabelLbl | Ctrl_Or_Lbl. |
| LookUp Usage | Available01Lbl | Avail_01 |
| LookUp Usage | OnlineStatusLbl | Onl_Status |
| LookUp Usage | LocationMetLbl | Loc_Met |
| LookUp Usage | Available02Lbl | Avail_02 |
| LookUp Usage | ContactTypeLbl | Cont_Typ. |
| LookUp Usage | Cont_Typ. | Use_03 |
| LookUp Usage | FormCaption | LookUp_Usage_W |
| LookUp Usage | Value01Lbl | Val. |
| LookUp Usage | OnlineContactsLbl | Online_Cont. |
| LookUp Usage | ObjectNameLbl | Obj_ID |
| LookUp Usage | CodeLbl | VB_Code |
| LookUp Usage | ObjectList02Lbl | Targ_Obj. |
| LookUp Usage | ObjectList01Lbl | Obj_Name |
| LookUp Usage | Available03Lbl | Avail_03 |
| LookUp Usage | BuddyCategoryLbl | Bud_Cat. |
| LookUp Usage | InUse04Lbl | Use_04 |
| LookUp Usage | Path01Lbl | Path_01 |
| LookUp Usage | ProgramLbl | Progr. |
| LookUp Usage | MetadataUtilityLbl | Metadata_Ut. |
| LookUp Usage | InUse05Lbl | Use_05 |
| LookUp Usage | Available05Lbl | Avail_05 |
| LookUp Usage | DocProjectIDLbl | Doc_Proj_ID |
| LookUp Usage | MPAARatingLbl | MPAA_Rat. |
| LookUp Usage | DataProviderLbl | Data_Prov. |
| LookUp Usage | cmdUpdateBtn | Upt |
| LookUp Usage | Path00Lbl | Path_00 |
| LookUp Usage | EventTypeIDLbl | Event_Typ_Id |
| LookUp Usage | Path02Lbl | Path_02 |
| LookUp Usage | APIDataProviderIDLbl | API_Dat_Prov. |
| LookUp Usage | ApiKeyLbl | API_Key |
| LookUp Usage | TotalRecordsLbl | Total_Rows |
| LookUp Usage | StudioLbl | Studio_W |
| LookUp Usage | cmdCloseBtn | Bye |
| LookUp Usage | InUse07Lbl | Use_07 |
| LookUp Usage | DocRunProgramIDLbl | DocRunProgram |
| LookUp Usage | tblTempChkLbl | tblTmpChk |
| LookUp Usage | DocNameLbl | DocName |
| LookUp Usage | Available04Lbl | Avail_07 |
| LookUp Usage | InUse04Lbl | Use_04 |
| LookUp Usage | TemplateLbl | Documents |
| LookUp Usage | ProgramLocationLbl | Progr_Location |
| LookUp Usage | ProgramNameLbl | Progr_Name |
| LookUp Usage | Available07Lbl | Avail_07 |
| LookUp Usage | DocLocationLbl | DocLocation |
| LookUp Usage | Usr00Lbl | Usr00 |
| LookUp Usage | InUse08Lbl | InUse08 |
| LookUp Usage | Available08Lbl | Avail_08 |
| LookUp Usage | Usr01Lbl | Usr01 |
| LookUp Usage | StrUp00Lbl | StrUp00 |
| LookUp Usage | InUse09Lbl | InUse09 |
| LookUp Usage | Available09Lbl | Avail_09 |
| LookUp Usage | StrUp01Lbl | StrUp01 |
| LookUp Usage | Frm01Lbl | Frm01 |
| LookUp Usage | BkUpLbl | BkUp_W |
| LookUp Usage | InUse10Lbl | InUse09 |
| LookUp Usage | Available10Lbl | Avail10 |
| LookUp Usage | BkUpPathLbl | BkUpPath |
| LookUp Usage | LicenseLbl | License |
| LookUp Usage | InUse11Lbl | InUse11 |
| LookUp Usage | Available11Lbl | Avail.11 |
| LookUp Usage | StageListLbl | StageList |
| LookUp Usage | StageInAppLbl | StageInApp |
| LookUp Usage | LicenseKeyLbl | LicenseKey |
| LookUp Usage | LicenseTypeLbl | LicenseType |
| LookUp Usage | LicenseInstancesLbl | LicenseInstances |
| LookUp Usage | DbBELbl | Back_End_W |
| LookUp Usage | InUse12Lbl | InUse12 |
| LookUp Usage | Available12Lbl | Avail_12 |
| LookUp Usage | DbBENameLbl | Name_W |
| LookUp Usage | DbBEPathLbl | Path_W |
| LookUp Usage | DbBEPathTemplateLbl | Template_W |
| LookUp Usage | CoContactsLbl | Co. Cont. |
| LookUp Usage | InUse13Lbl | InUse13 |
| LookUp Usage | Available13Lbl | Avail.13 |
| LookUp Usage | CoContRecordsLbl | Co. Cont. Recs. |
| LookUp Usage | OnlContactsLbl | Onl. Cont. |
| LookUp Usage | InUse14Lbl | InUse14 |
| LookUp Usage | Available14Lbl | Avail.14 |
| LookUp Usage | OnlContRecordsLbl | Onl. Cont. Recs. |
| LookUp Usage | MetUtilLbl | Met. Util. |
| LookUp Usage | InUse15Lbl | InUse 15 |
| LookUp Usage | Available15Lbl | Avail.15 |
| LookUp Usage | MetUtilRecords01Lbl | Main Recs. |
| LookUp Usage | MetUtilRecords02Lbl | Child Recs. |
| LookUp Usage | CaseEventsLbl | Case Evts. |
| LookUp Usage | InUse16Lbl | InUse 16 |
| LookUp Usage | Available16Lbl | Avail.16 |
| LookUp Usage | CaseEventsRecordsLbl | MainRecs. |
| LookUp Usage | CaseEventsArchive0101Lbl | ArchiveRecs01 |
| LookUp Usage | CaseEventsArchive0201Lbl | ArchiveRecs02 |
| LookUp Usage | CaseEventsArchive0301Lbl | ArchiveRecs03 |
| LookUp Usage | CaseEventsArchive0401Lbl | ArchiveRecs04 |
| LookUp Usage | CaseEventsArchive0501Lbl | ArchiveRecs05 |
| LookUp Usage | CaseEventsArchive0601Lbl | ArchiveRecs06 |
| LookUp Usage | CaseEventsArchive0701Lbl | ArchiveRecs07 |
| LookUp Usage | CaseEventsArchive0801Lbl | ArchiveRecs08 |
| LookUp Usage | CaseEventsArchive0901Lbl | ArchiveRecs09 |
| LookUp Usage | CaseEventsArchive1001Lbl | ArchiveRecs10 |
| Metadata Utility | Pg03 | Folder_s |
| Metadata Utility | OverviewLbl | Detail |
| Metadata Utility | FormCaption | XML_U |
| Metadata Utility | SearchLbl | Look |
| Metadata Utility | Pg01 | WMC |
| Metadata Utility | TitleLbl | Tlt_01 |
| Metadata Utility | TitleSuppLbl | Tlt_02 |
| Metadata Utility | WMCIDLbl | id |
| Metadata Utility | cmdEditBtn | Edit |
| Metadata Utility | DateLbl | Date_W |
| Metadata Utility | ChkLbl | Ck |
| Metadata Utility | Path01Lbl | Path |
| Metadata Utility | ProviderRatingLbl | Prov. |
| Metadata Utility | CommunityLbl | Comm. |
| Metadata Utility | MPAARatingLbl | M.P.A.A. |
| Metadata Utility | DataProviderLbl | Data_Prov. |
| Metadata Utility | GenreLbl | Genr. |
| Metadata Utility | StudioLbl | Stud. |
| Metadata Utility | DuratioinLbl | Dur. |
| Metadata Utility | Pg02 | Pth |
| Metadata Utility | RatingLbl | Rating_W |
| Metadata Utility | Pg04 | Folder_L |
| Metadata Utility | DirectorLbl | Dir. |
| Metadata Utility | DirectorLbl | Dir. |
| Metadata Utility | IDLbl | Link |
| Metadata Utility | cmdCloseBtn | Bye |
| Metadata Utility | TaglineLbl | Tagln. |
| Metadata Utility | cmdAddNewBtn | New |
| Metadata Utility | PathLbl | Path_Full |
| Metadata Utility | XMLlargeCoverParamsLbl | XML_large |
| Metadata Utility | XMLsmallCoverParamsLbl | XML_Small |
| Metadata Utility | FolderLLbl | Folder_L |
| Metadata Utility | FolderLbl | Folder_s |
| Metadata Utility | MovieVideo_TSLbl | Vid_TS |
| Metadata Utility | cmdEventsBtn | Event |
| Metadata Utility | CastLbl | Cst. |
| Metadata Utility | CmdXMLIDBtn | xmlid |
| Metadata Utility | XMLLocationLbl | xml location |
| Metadata Utility | Img01Lbl | Img01 |
| Metadata Utility | Img02Lbl | Img02 |
| Metadata Utility | MSFRChkLbl | MSFR |
| Metadata Utility Bulk Update Process | TitleLbl | TitleLbl |
| Metadata Utility Bulk Update Process | cmdCloseBtn | Bye |
| Metadata Utility Bulk Update Process | cmdSearchBtn | Search_W |
| Metadata Utility Bulk Update Process | Path01Lbl | Selector |
| Metadata Utility Bulk Update Process | SelectLbl | Sel. |
| Metadata Utility Bulk Update Process | PathUpdateLbl | Update_to |
| Metadata Utility Bulk Update Process | cmdUpdateBtn | Upt. |
| Metadata Utility Bulk Update Process | FormCaption | Metadata_Utility_BUP |
| Metadata Utility Bulk Update Process | FullPathLbl | Path |
| Metadata Utility Bulk Update Process | IDLbl | id |
| Metadata Utility Online Search Tool Movies | IDLbl | id |
| Metadata Utility Online Search Tool Movies | DirectorLbl | Dir. |
| Metadata Utility Metadata Utility Online Search Tool Movies | SearchLbl | Find |
| Metadata Utility Online Search Tool Movies | FormCaption | Metadata_Utility_Online_Search_Tool_W |
| Metadata Utility Online Search Tool Movies | Label0 | Dnwld. Cmplt. |
| Metadata Utility Online Search Tool Movies | SelectLbl | Sel. |
| Metadata Utility Online Search Tool Movies | CastLbl | Cst. |
| Metadata Utility Online Search Tool Movies | DateLbl | Dt. |
| Metadata Utility Online Search Tool Movies | OverviewLbl | Detail |
| Metadata Utility Online Search Tool Movies | TaglineLbl | Tagl. |
| Metadata Utility Online Search Tool Movies | GenreLbl | Genr. |
| Metadata Utility Online Search Tool Movies | UploadBtn | Upl |
| Metadata Utility Online Search Tool Movies | cmdCloseBtn | Bye |
| Metadata Utility Online Search Tool Movies | TitleLbl | Titl. |
| Metadata Utility Online Search Tool Movies | cmdSearchBtn | Search_W |
| Metadata Utility Online Search Tool Shows | FormCaption | XMLU Srch. Tool W |
| Metadata Utility Online Search Tool Shows | Label0 | Dnwld. Cmplt. |
| Metadata Utility Online Search Tool Shows | SearchLbl | Find |
| Metadata Utility Online Search Tool Shows | cmdSearchBtn | Srch. W |
| Metadata Utility Online Search Tool Shows | ShowLbl | Shw. |
| Metadata Utility Online Search Tool Shows | SeasonLbl | Ssn. |
| Metadata Utility Online Search Tool Shows | SelectLbl | Sel. |
| Metadata Utility Online Search Tool Shows | IDLbl | id |
| Metadata Utility Online Search Tool Shows | DateLbl | Dt. |
| Metadata Utility Online Search Tool Shows | TitleLbl | Titl. |
| Metadata Utility Online Search Tool Shows | CastLbl | Cst. |
| Metadata Utility Online Search Tool Shows | DirectorLbl | Dir. |
| Metadata Utility Online Search Tool Shows | OverviewLbl | Det. |
| Metadata Utility Online Search Tool Shows | TaglineLbl | Tagl. |
| Metadata Utility Online Search Tool Shows | GenreLbl | Genr. |
| Metadata Utility Online Search Tool Shows | UploadBtn | Upl |
| Metadata Utility Online Search Tool Shows | cmdCloseBtn | Bye |
| Metadata Utility Bulk Import Process Master Records | FormCaption | XMLU Srch. Tool W. |
| Metadata Utility Bulk Import Process Master Records | SearchLbl | Find |
| Metadata Utility Bulk Import Process Master Records | cmdSearchBtn | Srch. W |
| Metadata Utility Bulk Import Process Master Records | Label0 | Dnwld. Cmplt. |
| Metadata Utility Bulk Import Process Master Records | SelectLbl | Sel. |
| Metadata Utility Bulk Import Process Master Records | IDLbl | id |
| Metadata Utility Bulk Import Process Master Records | DateLbl | Dt. |
| Metadata Utility Bulk Import Process Master Records | TitleLbl | Titl. |
| Metadata Utility Bulk Import Process Master Records | CastLbl | Cst. |
| Metadata Utility Bulk Import Process Master Records | DirectorLbl | Dir. |
| Metadata Utility Bulk Import Process Master Records | OverviewLbl | Det. |
| Metadata Utility Bulk Import Process Master Records | TaglineLbl | Tagl. |
| Metadata Utility Bulk Import Process Master Records | GenreLbl | Genr. |
| Metadata Utility Bulk Import Process Master Records | DurationLbl | Dur. |
| Metadata Utility Bulk Import Process Master Records | StudioLbl | Std. |
| Metadata Utility Bulk Import Process Master Records | DataProviderLbl | DtPrv. |
| Metadata Utility Bulk Import Process Master Records | MPAARatingLbl | M.P.A.A. |
| Metadata Utility Bulk Import Process Master Records | RatingComLbl | RTCom. |
| Metadata Utility Bulk Import Process Master Records | RatingPrvLbl | RtPrv. |
| Metadata Utility Bulk Import Process Master Records | PosterLbl | Pstr. |
| Metadata Utility Bulk Import Process Master Records | BackdropLbl | BkDp. |
| Metadata Utility Bulk Import Process Master Records | cmdAllRecsBtn | All Recs. |
| Metadata Utility Bulk Import Process Master Records | UploadBtn | Upl |
| Metadata Utility Bulk Import Process Master Records | cmdCloseBtn | Bye |
| Metadata Utility Duplicates | cmdCloseBtn | Bye |
| Metadata Utility Bulk Import Process Child Records | FormCaption | XMLU Srch. Tool W. |
| Metadata Utility Bulk Import Process Child Records | SearchLbl | Find |
| Metadata Utility Bulk Import Process Child Records | cmdSearchBtn | Srch. W |
| Metadata Utility Bulk Import Process Child Records | Label0 | Dnwld. Cmplt. |
| Metadata Utility Bulk Import Process Child Records | SelectLbl | Sel. |
| Metadata Utility Bulk Import Process Child Records | IDLbl | id |
| Metadata Utility Bulk Import Process Child Records | TitleLbl | Titl. |
| Metadata Utility Bulk Import Process Child Records | Path01tLbl | Path01 |
| Metadata Utility Bulk Import Process Child Records | Path02Lbl | Path02 |
| Metadata Utility Bulk Import Process Child Records | Path03Lbl | Path03 |
| Metadata Utility Bulk Import Process Child Records | cmdAllRecsBtn | All Recs. |
| Metadata Utility Bulk Import Process Child Records | UploadBtn | Upl |
| Metadata Utility Bulk Import Process Child Records | cmdCloseBtn | Bye |
| Online Contacts | IDLbl | id |
| Online Contacts | Pg05 | 05 |
| Online Contacts | ScreennamesLbl | Screennam. |
| Online Contacts | NickNameLbl | NickNam. |
| Online Contacts | LastNameLbl | Last_Nam. |
| Online Contacts | FirstNameLbl | First_Nam. |
| Online Contacts | FinderLbl | Search |
| Online Contacts | ActiveLbl | Act. |
| Online Contacts | DateLbl | Date |
| Online Contacts | ContTypLbl | Cont_Typ. |
| Online Contacts | LocationLbl | Loc. |
| Online Contacts | DOBLbl | DOB |
| Online Contacts | PictureLbl | Pic. |
| Online Contacts | IMScrNmLbl | IM_Scr_Nm. |
| Online Contacts | Pg02 | 02 |
| Online Contacts | AOLScrNmLbl | AOL_Scr_Nm. |
| Online Contacts | FormCaption | Online_Contacts_W |
| Online Contacts | VPScrNmLbl | VP_Scr_Nm. |
| Online Contacts | BudCatLbl | Bud_Cat. |
| Online Contacts | StatusLbl | Stat. |
| Online Contacts | MailingAddressLbl | Address |
| Online Contacts | Pg01 | 01 |
| Online Contacts | EmailWorkLbl | Email_Work |
| Online Contacts | CityLbl | Cty. |
| Online Contacts | ZipLbl | ZIP |
| Online Contacts | Email1Lbl | Email_01 |
| Online Contacts | FaxLbl | Fax |
| Online Contacts | EmailSchoolLbl | Email_School |
| Online Contacts | EmailMainLbl | Email_Main |
| Online Contacts | LocationMetLbl | Loc_Met |
| Online Contacts | Pg04 | 04 |
| Online Contacts | Phone2Lbl | Phone_02 |
| Online Contacts | WorkLbl | Work |
| Online Contacts | WorkFax | Work_Fx. |
| Online Contacts | cmdEditBtn | Edit |
| Online Contacts | cmdEventsBtn | Event |
| Online Contacts | cmdAllRecsBtn | All |
| Online Contacts | Phone1Lbl | Phone_01 |
| Online Contacts | cmdCloseBtn | Bye |
| Online Contacts | Pg03 | 03 |
| Online Contacts | StLbl | ST |
| Online Contacts | CountryLbl | Ctry. |
| Program | cmdOpenBtn | Run |
| Program | IDLbl | id |
| Program | FormCaption | Progr. |
| Program | ProgramLocationlbl | Location |
| Program | cmdCloseBtn | Bye |
| Program | cmd01Btn | 01 |
| Program | cmd02Btn | 02 |
| Program | ProgramChkLbl | Act? |
| Program | ProgramLbl | Progr. |
| Report Company Contacts Activity | Label05 | Custom_Label_05_Version_One |
| Report Company Contacts Activity | Label05 | Custom_Label_05_Version_Two |
| Report Company Contacts Activity | Label05 | Custom_Label_05 Version_Three |
| Report Company Contacts Activity | Label04 | Custom_Label_04_Version_One |
| Report Company Contacts Activity | Label04 | Custom_Label_04_Version_Two |
| Report Company Contacts Activity | Label03 | Name_Vorname_MyLastNameHere_MyFirstNameHere |
| Report Company Contacts Activity | Label02 | Custom_Label_02_Version_One |
| Report Company Contacts Activity | Label02 | Custom_Label_02_Version_Two |
| Report Company Contacts Activity | Label01 | Custom_Label_01_Version_One |
| Report Company Contacts Activity | Label11 | Results |
| Report Company Contacts Activity | Label12 | Type_of_Communication_1_in_Person_2_in_Writing_3_Telephone_4_Online_5_Email |
| Report Company Contacts Activity | Label01 | Nachweis_von_Aktivitäten |
| Report Company Contacts Activity | Label12 | Art_der_Kommunikation_1_Persönlich_2_Schriftlich_3_Telefonisch_4_Online_5_Email |
| Report Company Contacts Activity | Label06 | Date |
| Report Company Contacts Activity | Label10 | Art_der Kommunikation |
| Report Company Contacts Activity | Label10 | Type_of Communication |
| Report Company Contacts Activity | Label09 | Grund |
| Report Company Contacts Activity | Label09 | Tätigkeit |
| Report Company Contacts Activity | Label08 | Ansprechpartner |
| Report Company Contacts Activity | Label07 | Firma_Anschrift_Telefon) |
| Report Company Contacts Activity | ReportCaption | IRS_Report |
| Report Company Contacts Labels | ReportCaption | Co_Labels_to_Mail |
| Report Company Contacts to Mail | Label09 | Lbl_09 |
| Report Company Contacts to Mail | Label03 | Lbl._03 |
| Report Company Contacts to Mail | Label04 | Lbl_04 |
| Report Company Contacts to Mail | ReportCaption | Co_Cont_to_Mail |
| Report Company Contacts to Mail | Label00 | Lbl_00 |
| Report Company Contacts to Mail | Label01 | Lbl_01 |
| Report Company Contacts to Mail | Label05 | Lbl_05 |
| Report Company Contacts to Mail | Label08 | Lbl_08 |
| Report Company Contacts to Mail | Label10 | Lbl_10 |
| Report Company Contacts to Mail | Label06 | Lbl_06 |
| Report Company Contacts to Mail | Label02 | Lbl_02 |
| Report Company Contacts to Mail | Label07 | Lbl_07 |
| Report Metadata Utility XML (01) | ReportCaption | XML_01 |
| Report Metadata Utility XML (02) | ReportCaption | XML_02 |
| Report Online Contacts Do NOT Mail | Label03 | Lbl_03 |
| Report Online Contacts Do NOT Mail | ReportCaption | Onl_Cont_D_NOT_Mail |
| Report Online Contacts Do NOT Mail | Label00 | Lbl_00 |
| Report Online Contacts Do NOT Mail | Label01 | Lbl_01 |
| Report Online Contacts Do NOT Mail | Label02 | Lbl_02 |
| Report Online Contacts Do NOT Mail | Label04 | Lbl_04 |
| Report Online Contacts Inactive Profiles | Label06 | Lbl_06 |
| Report Online Contacts Inactive Profiles | Label05 | Lbl_05 |
| Report Online Contacts Inactive Profiles | ReportCaption | Onl_Cont_Inactive_Profiles |
| Report Online Contacts Inactive Profiles | Label00 | Lbl_00 |
| Report Online Contacts Inactive Profiles | Label01 | Lbl_01 |
| Report Online Contacts Inactive Profiles | Label04 | Lbl_04 |
| Report Online Contacts Inactive Profiles | Label07 | Lbl_07 |
| Report Online Contacts Inactive Profiles | Label08 | Lbl_08 |
| Report Online Contacts Inactive Profiles | Label09 | Lbl_09 |
| Report Online Contacts Inactive Profiles | Label10 | Lbl_10 |
| Report Online Contacts Inactive Profiles | Label03 | Lbl_03 |
| Report Online Contacts Inactive Profiles | Label02 | Lbl_02 |
| Report Online Contacts Labels | ReportCaption | Onl_Cont_Labels |
| Report Online Contacts New Profiles | ReportCaption | Onl_Cont_New_Profiles |
| Report Online Contacts New Profiles | Label00 | Lbl_00 |
| Report Online Contacts New Profiles | Label01 | Lbl_01 |
| Report Online Contacts New Profiles | Label02 | Lbl_02 |
| Report Online Contacts New Profiles | Label03 | Lbl_03 |
| Report Online Contacts New Profiles | Label04 | Lbl_04 |
| Report Path’s In Use | ReportCaption | Met_Util_Pths_in_Use |
| Report Path’s In Use | Label00 | Lbl_00 |
| Report Path’s In Use | Label01 | Lbl_01 |
| Report Path’s In Use | Label02 | Lbl_02 |
| Report Path’s In Use | Label03 | Lbl_03 |
| Report Path’s In Use | Label04 | Lbl_04 |
| Zoom | FormCaption | Zoom W |
| Zoom | cmdOkBtn | Okie |
| Zoom | cmdCancelBtn | Bye |
Metadata Utility – Object Management List
See secion(s):
‘Metadata Utility – XML ID Verification’ click here.
Check the ‘Suspect’ Queue – After running ‘Metadata Utility – XML ID Verification’, Metadata Utility will ‘flag’ any record(s) with missing XML files into the ‘Suspect’ Queue – ‘Events’ and create/re-create the needed Metadata Files as needed.
‘Reset (Delete) ‘Windows Media Center Local Profile Metadata Cache’ and Re-Cache (Re-Download) ‘Windows Media Center Local Profile Metadata Cache’ click here.
This is the ‘nuclear’ option. If all fails and you don’t seem to get Windows Media Center to show the Metadata Information (for some and/or all movies in the library), then this is your best option to start fresh and have Metadata Utility re-built/re-create the Metadata Information for all the movies in the Library.
See section ‘Metadata Utility – Reports – Path’s In Use’ click here.
Relational Database Management System.
Metadata Utility allows you to enable tracking of changes in within the application.
In order to enable ‘Data Audit’, from the Main Switchboard, click on ‘About Metadata Utility’ – click on the check box next to ‘Audit Enabled’. Once this feature is enabled, then you can open ‘Data Audit’ (Main Switchboard – Enter/View Information Switchboard – Data Audit) and see the logging/tracking of the changes in the Data, namely changes in the Data in ‘Online Contacts’, ‘Company Contacts’ and any of the Look Up Values such as ‘Country’ Drop Down Menu, ‘Input Mask’ (for Telephone Number formatting), ‘Studio’ List-Drop Down Menu, ‘MPAA Rating’ List-Drop Down Menu, ‘Path Builders’ List-Drop Down Menus respectively.
With ‘Data Audit’ Enabled, Metadata Utility will keep track of changes on the Data in within the application.
This functionality of ‘Data Audit’ however, will NOT keep track of changes directly made in ‘Metadata Utility’ itself. This is due to the extensive amount of logging that can be generated in Metadata Utility which, in our Legacy Version(s), we’ve seen customers who had ‘Data Audit’ enabled and at a later time seen tickets where the computer HD was full due to the large size of the logs generated by ‘Data Audit’. For this main reason, on all Versions of ‘Metadata Utility after 2010, we’ve explicitly disabled the Logging, even the ‘Data Audit’ is enabled for any changes in the Data while using ‘Metadata Utility’ itself.
‘Look Up Usage’ allows you to see the amount of ‘Look Up’ Records (ie. Country Code(s), Case Event(s) Categories, Input Mask (for Telephone Numbers), Studio List, etc)
You can open ‘Look Up Count’ (Main Switchboard – Enter/View Information Switchboard – Look Up Usage) and see the usage of any of the ‘Look up’ entries across the system. This is helpful for those users that want a granulated control of their Data and see where that Data Usage is stored in the Back End Database and what that usage is.

Verify that the Path of the Movie + Path for the CoverArt Files is correct.
Verify that the NAS (or Partition) where the Movies are located is Online.
For additional Information please look at section: ‘Metadata Utility: Path’.
Though useful for advanced users, there is little benefits that bring to have this feature in Metadata Utility, thus, together with ‘Change Switchboard Items’, this feature has been Deprecated.
Only user’s with a Legacy installation of Metadata Utility (meaning those users have NOT updated –even if that update was/were free of charge- to a newer Version and continue to use the Version they purchased a license for) will have this feature still enabled in Metadata Utility.
Over the years we have been back and forward with having this feature and later, due to either feedback and/or issues we kept seeing with certain user’s that managed through ‘Change Switchboard Items’ to render Metadata Utility usable, is that we decided to Deprecate this feature.
Geek me out, tell me more!
We believe that user’s should have as much control over their Data and Application that controls that Data as possible. For that reason, is that ‘Change Switchboard Items’ was originally included in Metadata Utility.
Arguments for to have ‘Change Switchboard Items’
-User’s can customize their Switchboard(s) and have a different order of how the different features in within Metadata Utility are accessed.
Arguments against to have ‘Change Switchboard Items’
-User’s could ‘customize’ beyond a ‘normal’ and ‘possible’ operation (in other words, Deleted and or mangled the Controls in the Switchboards, that we ended up being inundated with Tickets where Metadata was unusable and had to ‘reset’ their setup
Only user’s with a Legacy installation of Metadata Utility (meaning those users have NOT updated –even if that update was/were free of charge- to a newer Version and continue to use the Version they purchased a license for) will have this feature still enabled in Metadata Utility.
-WMC Coverart
-What about Movie’s Coverart?
By design, Metadata Utility can manage ANY type of naming conventions to display Movie’s Coverart*.
Having said that, we’ve gone over the years back and forward with this issue and found that the ‘more’ flexibility Metadata Utility provided, the more and more ANY more problems our users would create. For that main reason, since 2010, Metadata Utility’s ‘Coverart files was ‘locked’ to
‘Folder.jpg’
For small, thumb-size Coverart.
‘Folder.L.jpg’
For large, poster-size Coverart.
The ‘main’ benefit of this change, ie. locking the naming convention for the Coverart file name, is that by ‘default’ Windows Media Center will look inside any given directory where a movie is supposed to be and ‘if’ a Coverart File named ‘Folder.jpg’ –without the single quotes– is found, then Windows Media Center will automatically display that Coverart file. So in essence, by having that simple naming convention, even without Metadata Utility, you will have your movies display their Coverart file ‘automatically’ in Windows Media Center without any further needed modifications/changes or any other programs.
Where it becomes a bit more complex and as indicated before, Metadata Utility can very easily link a Coverart file for example named ‘mycoverart.jpg’, or ‘The_Movie_Name_Here.jpg’, etc. Infact, Metadata Utility ‘legacy’ –and no longer supported, but those who still have them, are to this data still functional– Versions, each user could give the actual name for the ‘small’ or thumbsize Coverart as well as the ‘large’ Poster size Coverart file respectively. You see, once you have a XML Metadata File for Windows Media Center, you basically can ‘override’ Windows Media Center ‘default’ search for the ‘folder.jpg’ Coverart file and basically re-direct Windows Media Center to use the whatever file name that you chose to give for a particular movie.
Sounds cool, other????
Well, again, as said before, after seeing literally thousands of tickets and requests for help! through our support team, is that we decided to ‘less’ is ‘more’ approach, and though we had to ‘fix’ and take away the ability to give whatever file name to the Coverart, as a whole and in the large scheme of things, our help support requests, alone on that topic ‘Coverart not shown’ dropped 98.9%!.
Now, if you are still reading at this point, we should ‘add’, that once you are using XML File(s) to manage/further enhance your Windows Media Center Library (to show details about the movie, etc), then Windows Media Center will substitute the ‘default’ use of the ‘small’ Coverart file for the ‘larger’ one, thus, though you may not noticed it, but on Home Theater PC (aka. HTC) setups, you will sure notice that your Coverart files have a LOT more definition/resolution to each image… whelp???… that is because Windows Media Center not only is using the larger Coverart file (folder.L.jpg), but it is also Caching it to your local profile as well.
Note: The Coverart ‘Folder.jpg’ as well as ‘Folder.L.jpg’ msut be, just as the Movie, downloaed and placed in within a Folder for each Movie in the Library.
*Keeping in compliance with the supported File extension’s that Windows Media Center supports for Coverart Files.
A Metadata Utility License allows you to have:
-unrestricted use of Metadata Utility and all it’s features
-Security Updates –should there be any– at free of charge (Upgrades are not included in the price of a License – some exceptions may apply.)
-Full access to our Tech-Support
Yes. Contact our Sales Team for additional Information.
Metadata Utility is free to download and install.
Though some basic features are available without a License (see our detail documentation in what is covered and what is not additional Information), in order to fully Manage your Windows Media Center Metadata Library, then you will require a License for Metadata Utility.
This section applies only to the following in within Metadata Utility:
-Telephone Number’s Input Mask
-Fax Number’s Input Mask
Each Country Code (and thus Country) is allows you to determine an InputMask for the mentioned above Fields in within Metadata Utility.
As described by Microsoft and in compliance with Metadata Utility’s Programming:
InputMask Property
You can use the InputMask property to make data entry easier and to control the values users can enter in a text box control. Read/write String.
Remarks
Input masks are helpful for data-entry operations such as an input mask for a Phone Number field that shows you exactly how to enter a new number: () –__.
The InputMask property can contain up to three sections separated by semicolons (;).
Section Description
First Specifies the input mask itself; for example, !(999) 999-9999. For a list of characters you can use to define the input mask, see the following table.
Second Specifies whether Microsoft Access stores the literal display characters in the table when you enter data. If you use 0 for this section, all literal display characters (for example, the parentheses in a phone number input mask) are stored with the value; if you enter 1 or leave this section blank, only characters typed into the control are stored.
Third Specifies the character that Microsoft Access displays for the space where you should type a character in the input mask. For this section, you can use any character; to display an empty string, use a space enclosed in quotation marks (” “).
You use a string expression to set this property. For example, the following specifies an input mask for a text box control used for entering a phone number:
You can define an input mask by using the following characters.
Character Description
0 Digit (0 to 9, entry required, plus [+] and minus [–] signs not allowed).
9 Digit or space (entry not required, plus and minus signs not allowed).
Digit or space (entry not required; spaces are displayed as blanks while in Edit mode, but blanks are removed when data is saved; plus and minus signs allowed).
L Letter (A to Z, entry required).
? Letter (A to Z, entry optional).
A Letter or digit (entry required).
a Letter or digit (entry optional).
& Any character or a space (entry required).
C Any character or a space (entry optional).
. , : ; – / Decimal placeholder and thousand, date, and time separators. (The actual character used depends on the settings in the Regional Settings Properties dialog box in Windows Control Panel).
< Causes all characters to be converted to lowercase.
> Causes all characters to be converted to uppercase.
! Causes the input mask to display from right to left, rather than from left to right. Characters typed into the mask always fill it from left to right. You can include the exclamation point anywhere in the input mask.
\ Causes the character that follows to be displayed as the literal character (for example, \A is displayed as just A).
No. Metadata Utility’s Design is to help you Manage your Metadata Information for the Movies in your Media Library, not to complicate things.
In other words, Metadata Utility will never (and cannot) delete your Movies.
Metadata Utility allows you to Manage (create, edit, delete –but who would do that?–) your Movie’s Metadata Information. Having that said, Metadata Utility does have two Features that allows you to delete certain data. Those features are:
-Delete ‘Orphan Records’ from Metadata Utility (Movies are NOT part of your Windows Media Center Library. Those ‘Orphaned Records’ represent records that are found in Metadata Utility but you don’t have those Movies in your Windows Media Center Library). In other words, using this feature, you are NOT deleting Movies from your Windows Media Center Library.
-Delete ‘Windows Media Center Cache’. This feature would allow you to ‘reset’ by deleting your Windows Media Center XML Files from your Local Profile in your Computer. This feature cannot delete your Movies that you have in your Windows Media Center Library. If you use this feature, you would end up having your Windows Media Center Library look like this:
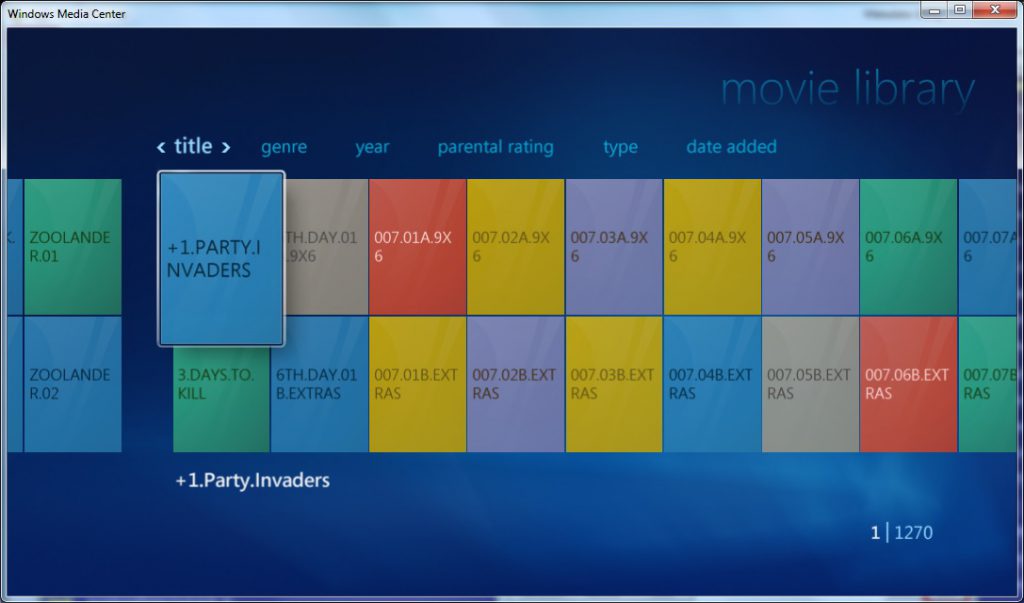
That said however, if you have any Metadata Utility Version after 2010 AND you are using the current Coverart Naming conventions as defined in our documentation, then, even if you delete all your Windows Media Center Profile Cache from your Local Profile, you will still be able to see the Coverart in Windows Media Center. What you won’t see –after you deleted your Windows Media Center Local XML Cache, is that if you click on any Movie, then you won’t have any Metadata Information available for your Movies.
For additional Information, see the following Sections:
-Metadata Utility Maintenance Main Switchboard – Metadata Utility Maintenance Delete Switchboard
-Delete Orphan Records (Inser_Link_Here).
-Delete Windows Media Center Cache (Inser_Link_Here).
Note: Creating, Editing or Deleting your Movie’s Metadata Information will NOT delete your Movie in Windows Media Center*.
*Under a normal Windows Media Center Setup, where your Movies reside on a NAS Network Share, PC Partition.. Windows Media Center Movie Library MUST reside in at least one of the following:
-A Network Share
-A NAS Environment
-A HD Partition(s) and/or Directory (or Directories) that resides outside of the User’s Windows Local Profile. This either Partition(s) and/or Directory/Directories will serve as Root(s)/Source(s) to all of the Movies.
‘The Movie Database’ (TMDb) is the main Metadata source. To use this service, you need to sign up for ‘The Movie Database’ (TMDb) and request an API Key:
-Login to TMDB (https://www.themoviedb.org)
-(Click on your) User ID (top right corner) and select – Settings
-(left side click) API
-Request API Key
-Copy the ‘API Key (v3 auth)’ key and paste it as the first option in the ‘Data Provider Key Management’ Tool.
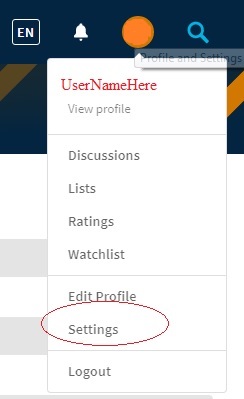
-(left side click of your screen) API (click)
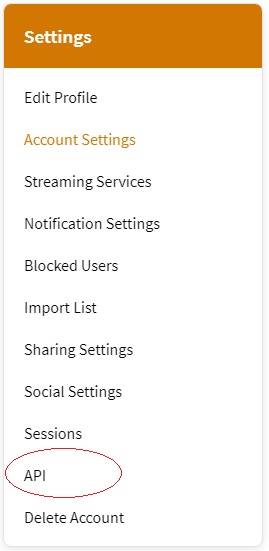
-Follow the process to Request API Key (click on appropriate option ie. select for Personal or Business option). Once you’ve completed the process, you will get your API Key.
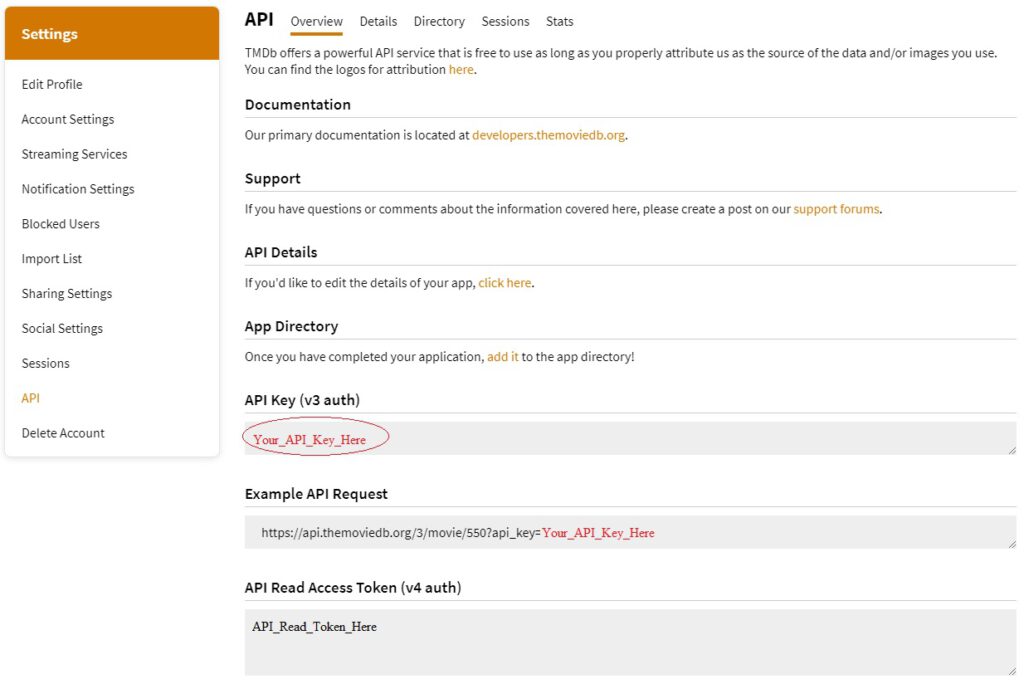
-Copy the ‘API Key (v3 auth)’ key and paste it as the first option, which should be ‘TMDB’ (as seen in the picture immediately below) in the ‘Data Provider Key Management’ Tool.

(Make sure you have ‘TMDb’ selected/active by clicking the ‘Active’ check box and make sure the First the very first entry is for ‘TMDb’)
If you have accidentaly deleted, changed, modified any Path Builder List 02 is no longer working properly or being displayed properly (can be that you made the changed a long time ago and just discovered that the Path Builder List 02 are Not being displayed properly), then you can repair and restore the default Path Builder List 02 as follows:
- Option
Restore your last BackUp prior to the change ‘WBe10.mde’ to ‘C:\DBases\Data’ (C:\DBases\Data\WBe10.mde) - Option (least invasive)
You can manually re-enter the Path Builder List 02 yourself – See the following Section(s): Metadata Utility – Description – ‘Path Builder’ Metadata Utility – Initial SetUp – Path Builder – Path Builder 02 - Option (reset to default)
-Close out of Metadata Utility (terminated using Windows Task Manager if you have to), once Metadata Utility is closed, then either
-download directly from our website a new ‘WBe10.mde’ and place it in ‘C:\DBases\Data’ (C:\DBases\Data\WBe10.mde) launch Metadata Utility and you are Done!
Note:
Restoring a Default installation of ‘WBe10.mde’ will also reset any of the following to a Default Installation/Configuration and Settings:
-Event Type Category List
-County Code, Country, Telephone(s) and Fax Number’s Input Mask(s)
-Status Category List
-Contact Type List
-Buddy Category List
-Location Met List
-Program Name/Location/Active/Not Active List
-Document List (not the Documents and/or Templates themselves)
-MPAA Rating List
-Data Provider List
-Studio List
-Resource Path List
-Path Builder List 01
-Path Builder List 02
-Data Provider API Key(s)
-Object Management
-Caption Management
-BackUp Path
-Licensing Information/Keys
Make sure you always keep a BackUp of you registration License/Keys
There is NO way to restore just ‘one’ of the above fields. The restore/reset is for ‘all’ or ‘none’ to a Default Installation and Settings.
If you have accidentally deleted, changed, modified any Path Builder List 01 is no longer working properly or being displayed properly (can be that you made the changed a long time ago and just discovered that the Path Builder List 01 are Not being displayed properly), then you can repair and restore the default Path Builder List 01 as follows:
- Option
Restore your last BackUp prior to the change ‘WBe10.mde’ to ‘C:\DBases\Data’ (C:\DBases\Data\WBe10.mde) - Option (least invasive)
You can manually re-enter the Path Builder List 01 yourself – See the following Section(s): Metadata Utility – Description – ‘Path Builder’ Metadata Utility – Initial SetUp – Path Builder – Path Builder 01 - Option (reset to default)
-Close out of Metadata Utility (terminated using Windows Task Manager if you have to), once Metadata Utility is closed, then either
-download directly from our website a new ‘WBe10.mde’ and place it in ‘C:\DBases\Data’ (C:\DBases\Data\WBe10.mde) launch Metadata Utility and you are Done!
Note:
Restoring a Default installation of ‘WBe10.mde’ will also reset any of the following to a Default Installation/Configuration and Settings:
-Event Type Category List
-County Code, Country, Telephone(s) and Fax Number’s Input Mask(s)
-Status Category List
-Contact Type List
-Buddy Category List
-Location Met List
-Program Name/Location/Active/Not Active List
-Document List (not the Documents and/or Templates themselves)
-MPAA Rating List
-Data Provider List
-Studio List
-Resource Path List
-Path Builder List 01
-Path Builder List 02
-Data Provider API Key(s)
-Object Management
-Caption Management
-BackUp Path
-Licensing Information/Keys
Make sure you always keep a BackUp of you registration License/Keys
There is NO way to restore just ‘one’ of the above fields. The restore/reset is for ‘all’ or ‘none’ to a Default Installation and Settings.
If you have accidentaly deleted, changed, modified any Resource List is no longer working properly or beeing displayed properly (can be that you made the changed a long time ago and just discovered that the Resource List are Not beeing displayed properly), then you can repair and restore the default Resource List as follows:
- Option
Restore your last BackUp prior to the change ‘WBe10.mde’ to ‘C:\DBases\Data’ (C:\DBases\Data\WBe10.mde) - Option (least invasive)
You can manually re-enter the Resource List yourself – See the following Section: Metadata Utility – Initial SetUp – Metadata Utility Resource - Option (reset to default)
-Close out of Metadata Utility (terminated using Windows Task Manager if you have to), once Metadata Utility is closed, then either
-download directly from our website a new ‘WBe10.mde’ and place it in ‘C:\DBases\Data’ (C:\DBases\Data\WBe10.mde) launch Metadata Utility and you are Done!
Note:
Restoring a Default installation of ‘WBe10.mde’ will also reset any of the following to a Default Installation/Configuration and Settings:
-Event Type Category List
-County Code, Country, Telephone(s) and Fax Number’s Input Mask(s)
-Status Category List
-Contact Type List
-Buddy Category List
-Location Met List
-Program Name/Location/Active/Not Active List
-Document List (not the Documents and/or Templates themselves)
-MPAA Rating List
-Data Provider List
-Studio List
-Resource Path List
-Path Builder List 01
-Path Builder List 02
-Data Provider API Key(s)
-Object Management
-Caption Management
-BackUp Path
-Licensing Information/Keys
Make sure you always keep a BackUp of you registration License/Keys
There is NO way to restore just ‘one’ of the above fields. The restore/reset is for ‘all’ or ‘none’ to a Default Installation and Settings.
If you have accidentally deleted, changed, modified any Studio List is no longer working properly or being displayed properly (can be that you made the changed a long time ago and just discovered that the Studio List are Not being displayed properly), then you can repair and restore the default Studio List as follows:
- Option
Restore your last BackUp prior to the change ‘WBe10.mde’ to ‘C:\DBases\Data’ (C:\DBases\Data\WBe10.mde) - Option (least invasive)
You can manually re-enter the Studio List yourself – See the following Section: Metadata Utility – Initial SetUp – Studio - Option (reset to default)
-Close out of Metadata Utility (terminated using Windows Task Manager if you have to), once Metadata Utility is closed, then either
-download directly from our website a new ‘WBe10.mde’ and place it in ‘C:\DBases\Data’ (C:\DBases\Data\WBe10.mde) launch Metadata Utility and you are Done!
Note:
Restoring a Default installation of ‘WBe10.mde’ will also reset any of the following to a Default Installation/Configuration and Settings:
-Event Type Category List
-County Code, Country, Telephone(s) and Fax Number’s Input Mask(s)
-Status Category List
-Contact Type List
-Buddy Category List
-Location Met List
-Program Name/Location/Active/Not Active List
-Document List (not the Documents and/or Templates themselves)
-MPAA Rating List
-Data Provider List
-Studio List
-Resource Path List
-Path Builder List 01
-Path Builder List 02
-Data Provider API Key(s)
-Object Management
-Caption Management
-BackUp Path
-Licensing Information/Keys
Make sure you always keep a BackUp of you registration License/Keys
There is NO way to restore just ‘one’ of the above fields. The restore/reset is for ‘all’ or ‘none’ to a Default Installation and Settings.
If you have accidentally deleted, changed, modified any Data Provider List is no longer working properly or being displayed properly (can be that you made the changed a long time ago and just discovered that the Data Provider List are Not being displayed properly), then you can repair and restore the default Data Provider List as follows:
- Option
Restore your last BackUp prior to the change ‘WBe10.mde’ to ‘C:\DBases\Data’ (C:\DBases\Data\WBe10.mde) - Option (least invasive)
You can manually re-enter the Data Provider List yourself – See the following Section(s):
Metadata Utility – Description – ‘Data Provider’ Metadata Utility – Initial SetUp – Data Provider - Option (reset to default)
-Close out of Metadata Utility (terminated using Windows Task Manager if you have to), once Metadata Utility is closed, then either
-download directly from our website a new ‘WBe10.mde’ and place it in ‘C:\DBases\Data’ (C:\DBases\Data\WBe10.mde) launch Metadata Utility and you are Done!
Note:
Restoring a Default installation of ‘WBe10.mde’ will also reset any of the following to a Default Installation/Configuration and Settings:
-Event Type Category List
-County Code, Country, Telephone(s) and Fax Number’s Input Mask(s)
-Status Category List
-Contact Type List
-Buddy Category List
-Location Met List
-Program Name/Location/Active/Not Active List
-Document List (not the Documents and/or Templates themselves)
-MPAA Rating List
-Data Provider List
-Studio List
-Resource Path List
-Path Builder List 01
-Path Builder List 02
-Data Provider API Key(s)
-Object Management
-Caption Management
-BackUp Path
-Licensing Information/Keys
Make sure you always keep a BackUp of you registration License/Keys
There is NO way to restore just ‘one’ of the above fields. The restore/reset is for ‘all’ or ‘none’ to a Default Installation and Settings.
If you have accidentaly deleted, changed, modified any MPAA Rating List is no longer working properly or beeing displayed properly (can be that you made the changed a long time ago and just discovered that the MPAA Rating List are Not beeing displayed properly), then you can repair and restore the default MPAA Rating List as follows:
- Option
Restore your last BackUp prior to the change ‘WBe10.mde’ to ‘C:\DBases\Data’ (C:\DBases\Data\WBe10.mde) - Option (least invasive)
You can manually re-enter the MPAA Rating List yourself – See the following Section(s):
Metadata Utility – Description – ‘MPAA Rating’ Metadata Utility – Initial SetUp – MPAA Rating - Option (reset to default)
-Close out of Metadata Utility (terminated using Windows Task Manager if you have to), once Metadata Utility is closed, then either
-download directly from our website a new ‘WBe10.mde’ and place it in ‘C:\DBases\Data’ (C:\DBases\Data\WBe10.mde) launch Metadata Utility and you are Done!
Note:
Restoring a Default installation of ‘WBe10.mde’ will also reset any of the following to a Default Installation/Configuration and Settings:
-Event Type Category List
-County Code, Country, Telephone(s) and Fax Number’s Input Mask(s)
-Status Category List
-Contact Type List
-Buddy Category List
-Location Met List
-Program Name/Location/Active/Not Active List
-Document List (not the Documents and/or Templates themselves)
-MPAA Rating List
-Data Provider List
-Studio List
-Resource Path List
-Path Builder List 01
-Path Builder List 02
-Data Provider API Key(s)
-Object Management
-Caption Management
-BackUp Path
-Licensing Information/Keys
Make sure you always keep a BackUp of you registration License/Keys
There is NO way to restore just ‘one’ of the above fields. The restore/reset is for ‘all’ or ‘none’ to a Default Installation and Settings.
If you have accidentally deleted, changed, modified any Document Name, Document Location, Opening with Program, Document in Project is no longer working properly or being displayed properly (can be that you made the changed a long time ago and just discovered that the Document Name, Document Location, Opening with Program, Document in Project are Not being displayed properly), then you can repair and restore the default Document Name, Document Location, Opening with Program, Document in Project as follows:
- Option
Restore your last BackUp prior to the change ‘WBe10.mde’ to ‘C:\DBases\Data’ (C:\DBases\Data\WBe10.mde) - Option (least invasive)
You can manually re-enter the Document Name, Document Location, Opening with Program, Document in Project yourself by double clicking the Document Name, Document Location, Opening with Program, Document in Project Field and edit the Document Name, Document Location, Opening with Program, Document in Project. - Option (reset to default)
-Close out of Metadata Utility (terminated using Windows Task Manager if you have to), once Metadata Utility is closed, then either
-download directly from our website a new ‘WBe10.mde’ and place it in ‘C:\DBases\Data’ (C:\DBases\Data\WBe10.mde) launch Metadata Utility and you are Done!
Note:
Restoring a Default installation of ‘WBe10.mde’ will also reset any of the following to a Default Installation/Configuration and Settings:
-Event Type Category List
-County Code, Country, Telephone(s) and Fax Number’s Input Mask(s)
-Status Category List
-Contact Type List
-Buddy Category List
-Location Met List
-Program Name/Location/Active/Not Active List
-Document List (not the Documents and/or Templates themselves)
-MPAA Rating List
-Data Provider List
-Studio List
-Resource Path List
-Path Builder List 01
-Path Builder List 02
-Data Provider API Key(s)
-Object Management
-Caption Management
-BackUp Path
-Licensing Information/Keys
Make sure you always keep a BackUp of you registration License/Keys
There is NO way to restore just ‘one’ of the above fields. The restore/reset is for ‘all’ or ‘none’ to a Default Installation and Settings.
If you have accidentally deleted, changed, modified any Program Name, Program Location, Program Active is no longer working properly or being displayed properly (can be that you made the changed a long time ago and just discovered that the Program Name, Program Location, Program Active are Not being displayed properly), then you can repair and restore the default Program Name, Program Location, Program Active as follows:
- Option
Restore your last BackUp prior to the change ‘WBe10.mde’ to ‘C:\DBases\Data’ (C:\DBases\Data\WBe10.mde) - Option (least invasive)
You can manually re-enter the Program Name, Program Location, Program Active yourself by double clicking the Program Name, Program Location, Program Active Field and edit the Program Name, Program Location, Program Active. - Option (reset to default)
-Close out of Metadata Utility (terminated using Windows Task Manager if you have to), once Metadata Utility is closed, then either
-download directly from our website a new ‘WBe10.mde’ and place it in ‘C:\DBases\Data’ (C:\DBases\Data\WBe10.mde) launch Metadata Utility and you are Done!
Note:
Restoring a Default installation of ‘WBe10.mde’ will also reset any of the following to a Default Installation/Configuration and Settings:
-Event Type Category List
-County Code, Country, Telephone(s) and Fax Number’s Input Mask(s)
-Status Category List
-Contact Type List
-Buddy Category List
-Location Met List
-Program Name/Location/Active/Not Active List
-Document List (not the Documents and/or Templates themselves)
-MPAA Rating List
-Data Provider List
-Studio List
-Resource Path List
-Path Builder List 01
-Path Builder List 02
-Data Provider API Key(s)
-Object Management
-Caption Management
-BackUp Path
-Licensing Information/Keys
Make sure you always keep a BackUp of you registration License/Keys
There is NO way to restore just ‘one’ of the above fields. The restore/reset is for ‘all’ or ‘none’ to a Default Installation and Settings.
If you have accidentally deleted, changed, modified any Picture Location List is no longer working properly or being displayed properly (can be that you made the changed a long time ago and just discovered that the Picture Location List are Not being displayed properly), then you can repair and restore the default Picture Location List as follows:
- Option
Restore your last BackUp prior to the change ‘WBe10.mde’ to ‘C:\DBases\Data’ (C:\DBases\Data\WBe10.mde) - Option (least invasive)
You can manually re-enter the Picture Location List yourself by double clicking the Picture Location Field and edit the Picture Location List. - Option (reset to default)
-Close out of Metadata Utility (terminated using Windows Task Manager if you have to), once Metadata Utility is closed, then either
-download directly from our website a new ‘WBe10.mde’ and place it in ‘C:\DBases\Data’ (C:\DBases\Data\WBe10.mde) launch Metadata Utility and you are Done!
Note:
Restoring a Default installation of ‘WBe10.mde’ will also reset any of the following to a Default Installation/Configuration and Settings:
-Event Type Category List
-County Code, Country, Telephone(s) and Fax Number’s Input Mask(s)
-Status Category List
-Contact Type List
-Buddy Category List
-Location Met List
-Program Name/Location/Active/Not Active List
-Document List (not the Documents and/or Templates themselves)
-MPAA Rating List
-Data Provider List
-Studio List
-Resource Path List
-Path Builder List 01
-Path Builder List 02
-Data Provider API Key(s)
-Object Management
-Caption Management
-BackUp Path
-Licensing Information/Keys
Make sure you always keep a BackUp of you registration License/Keys
There is NO way to restore just ‘one’ of the above fields. The restore/reset is for ‘all’ or ‘none’ to a Default Installation and Settings.
If you have accidentally deleted, changed, modified any Location Met List is no longer working properly or being displayed properly (can be that you made the changed a long time ago and just discovered that the Location Met List are Not being displayed properly), then you can repair and restore the default Location Met List as follows:
- Option
Restore your last BackUp prior to the change ‘WBe10.mde’ to ‘C:\DBases\Data’ (C:\DBases\Data\WBe10.mde) - Option (least invasive)
You can manually re-enter the Location Met List yourself by double clicking the Location Met Field and edit the Location Met List. - Option (reset to default)
-Close out of Metadata Utility (terminated using Windows Task Manager if you have to), once Metadata Utility is closed, then either
-download directly from our website a new ‘WBe10.mde’ and place it in ‘C:\DBases\Data’ (C:\DBases\Data\WBe10.mde) launch Metadata Utility and you are Done!
Note:
Restoring a Default installation of ‘WBe10.mde’ will also reset any of the following to a Default Installation/Configuration and Settings:
-Event Type Category List
-County Code, Country, Telephone(s) and Fax Number’s Input Mask(s)
-Status Category List
-Contact Type List
-Buddy Category List
-Location Met List
-Program Name/Location/Active/Not Active List
-Document List (not the Documents and/or Templates themselves)
-MPAA Rating List
-Data Provider List
-Studio List
-Resource Path List
-Path Builder List 01
-Path Builder List 02
-Data Provider API Key(s)
-Object Management
-Caption Management
-BackUp Path
-Licensing Information/Keys
Make sure you always keep a BackUp of you registration License/Keys
There is NO way to restore just ‘one’ of the above fields. The restore/reset is for ‘all’ or ‘none’ to a Default Installation and Settings.
If you have accidentaly deleted, changed, modified any Buddy Category List is no longer working properly or being displayed properly (can be that you made the changed a long time ago and just discovered that the Buddy Category List are Not being displayed properly), then you can repair and restore the default Buddy Category List as follows:
- Option
Restore your last BackUp prior to the change ‘WBe10.mde’ to ‘C:\DBases\Data’ (C:\DBases\Data\WBe10.mde) - Option (least invasive)
You can manually re-enter the Buddy Category List yourself by double clicking on the Buddy Category Field and edit the Buddy Category List. - Option (reset to default)
-Close out of Metadata Utility (terminated using Windows Task Manager if you have to), once Metadata Utility is closed, then either
-download directly from our website a new ‘WBe10.mde’ and place it in ‘C:\DBases\Data’ (C:\DBases\Data\WBe10.mde) launch Metadata Utility and you are Done!
Note:
Restoring a Default installation of ‘WBe10.mde’ will also reset any of the following to a Default Installation/Configuration and Settings:
-Event Type Category List
-County Code, Country, Telephone(s) and Fax Number’s Input Mask(s)
-Status Category List
-Contact Type List
-Buddy Category List
-Location Met List
-Program Name/Location/Active/Not Active List
-Document List (not the Documents and/or Templates themselves)
-MPAA Rating List
-Data Provider List
-Studio List
-Resource Path List
-Path Builder List 01
-Path Builder List 02
-Data Provider API Key(s)
-Object Management
-Caption Management
-BackUp Path
-Licensing Information/Keys
Make sure you always keep a BackUp of you registration License/Keys
There is NO way to restore just ‘one’ of the above fields. The restore/reset is for ‘all’ or ‘none’ to a Default Installation and Settings.
If you have accidentally deleted, changed, modified any Contact Type List is no longer working properly or being displayed properly (can be that you made the changed a long time ago and just discovered that the Contact Type List are Not being displayed properly), then you can repair and restore the default Contact Type List as follows:
- Option
Restore your last BackUp prior to the change ‘WBe10.mde’ to ‘C:\DBases\Data’ (C:\DBases\Data\WBe10.mde) - Option (least invasive)
You can manually re-enter the Contact Type List yourself by double clicking on the Contact Type Field and edit the Contact Type List. - Option (reset to default)
-Close out of Metadata Utility (terminated using Windows Task Manager if you have to), once Metadata Utility is closed, then either
-download directly from our website a new ‘WBe10.mde’ and place it in ‘C:\DBases\Data’ (C:\DBases\Data\WBe10.mde) launch Metadata Utility and you are Done!
Note:
Restoring a Default installation of ‘WBe10.mde’ will also reset any of the following to a Default Installation/Configuration and Settings:
-Event Type Category List
-County Code, Country, Telephone(s) and Fax Number’s Input Mask(s)
-Status Category List
-Contact Type List
-Buddy Category List
-Location Met List
-Program Name/Location/Active/Not Active List
-Document List (not the Documents and/or Templates themselves)
-MPAA Rating List
-Data Provider List
-Studio List
-Resource Path List
-Path Builder List 01
-Path Builder List 02
-Data Provider API Key(s)
-Object Management
-Caption Management
-BackUp Path
-Licensing Information/Keys
Make sure you always keep a BackUp of you registration License/Keys
There is NO way to restore just ‘one’ of the above fields. The restore/reset is for ‘all’ or ‘none’ to a Default Installation and Settings.
If you have accidentally deleted, changed, modified any Status List is no longer working properly or being displayed properly (can be that you made the changed a long time ago and just discovered that the Status List are Not being displayed properly), then you can repair and restore the default Status List as follows:
- Option
Restore your last BackUp prior to the change ‘WBe10.mde’ to ‘C:\DBases\Data’ (C:\DBases\Data\WBe10.mde) - Option (least invasive)
You can manually re-enter the Status List yourself by double clicking on the Status List field and Edit the Status List. - Option (reset to default)
-Close out of Metadata Utility (terminated using Windows Task Manager if you have to), once Metadata Utility is closed, then either
-download directly from our website a new ‘WBe10.mde’ and place it in ‘C:\DBases\Data’ (C:\DBases\Data\WBe10.mde) launch Metadata Utility and you are Done!
Note:
Restoring a Default installation of ‘WBe10.mde’ will also reset any of the following to a Default Installation/Configuration and Settings:
-Event Type Category List
-County Code, Country, Telephone(s) and Fax Number’s Input Mask(s)
-Status Category List
-Contact Type List
-Buddy Category List
-Location Met List
-Program Name/Location/Active/Not Active List
-Document List (not the Documents and/or Templates themselves)
-MPAA Rating List
-Data Provider List
-Studio List
-Resource Path List
-Path Builder List 01
-Path Builder List 02
-Data Provider API Key(s)
-Object Management
-Caption Management
-BackUp Path
-Licensing Information/Keys
Make sure you always keep a BackUp of you registration License/Keys
There is NO way to restore just ‘one’ of the above fields. The restore/reset is for ‘all’ or ‘none’ to a Default Installation and Settings.
If you have accidentally deleted, changed, modified any Country and/or Input Mask is no longer working properly or being displayed properly (can be that you made the changed a long time ago and just discovered that the Country and/or Input Mask are Not being displayed properly), then you can repair and restore the default Country and/or Input Mask as follows:
- Option
Restore your last BackUp prior to the change ‘WBe10.mde’ to ‘C:\DBases\Data’ (C:\DBases\Data\WBe10.mde) - Option (least invasive)
You can manually re-enter the Country and/or Input Mask yourself by double clicking on the ‘Country’ and/or any Telephone (of Fax) Number Country Code to open the Country Code and Input Mask Section to edit and correct any record(s) again. - Option (reset to default)
-Close out of Metadata Utility (terminated using Windows Task Manager if you have to), once Metadata Utility is closed, then either
-download directly from our website a new ‘WBe10.mde’ and place it in ‘C:\DBases\Data’ (C:\DBases\Data\WBe10.mde) launch Metadata Utility and you are Done!
Note:
Restoring a Default installation of ‘WBe10.mde’ will also reset any of the following to a Default Installation/Configuration and Settings:
-Event Type Category List
-County Code, Country, Telephone(s) and Fax Number’s Input Mask(s)
-Status Category List
-Contact Type List
-Buddy Category List
-Location Met List
-Program Name/Location/Active/Not Active List
-Document List (not the Documents and/or Templates themselves)
-MPAA Rating List
-Data Provider List
-Studio List
-Resource Path List
-Path Builder List 01
-Path Builder List 02
-Data Provider API Key(s)
-Object Management
-Caption Management
-BackUp Path
-Licensing Information/Keys
Make sure you always keep a BackUp of you registration License/Keys
There is NO way to restore just ‘one’ of the above fields. The restore/reset is for ‘all’ or ‘none’ to a Default Installation and Settings.
If you have accidentally deleted, changed, modified new or existing Case Event(s) Category List and all of the sudden you have discovered (can be that you made the changed a long time ago and just discovered that the Case Events are Not being displayed), then you can repair and restore the default Case Events as follows:
- Option
Restore your last BackUp prior to the change ‘WBe10.mde’ to ‘C:\DBases\Data’ (C:\DBases\Data\WBe10.mde) - Option (least invasive)
You can manually re-enter the Categories yourself – See ‘Metadata Utility – Edit Case Event Category’ Section - Option (reset to default)
-Close out of Metadata Utility (terminated using Windows Task Manager if you have to), once Metadata Utility is closed, then either
-download directly from our website a new ‘WBe10.mde’ and place it in ‘C:\DBases\Data’ (C:\DBases\Data\WBe10.mde) launch Metadata Utility and you are Done!
Note:
Restoring a Default installation of ‘WBe10.mde’ will also reset any of the following to a Default Installation/Configuration and Settings:
-Event Type Category List
-County Code, Country, Telephone(s) and Fax Number’s Input Mask(s)
-Status Category List
-Contact Type List
-Buddy Category List
-Location Met List
-Program Name/Location/Active/Not Active List
-Document List (not the Documents and/or Templates themselves)
-MPAA Rating List
-Data Provider List
-Studio List
-Resource Path List
-Path Builder List 01
-Path Builder List 02
-Data Provider API Key(s)
-Object Management
-Caption Management
-BackUp Path
-Licensing Information/Keys
Make sure you always keep a BackUp of you registration License/Keys.
There is NO way to restore just ‘one’ of the above fields. The restore/reset is for ‘all’ or ‘none’ to a Default Installation and Settings.
Though we have long deprecated the ‘Metadata Utility – Change Switchboard Items’ Section, it is possible, however unlikely, that you managed somehow, to corrupt the Back-End that Switchboard Manager uses.
In that case, do the following:
-Close out of Metadata Utility (terminated using Windows Task Manager if you have to), once Metadata Utility is closed, then either
-restore from your BackUp ‘WBe06.mde’ to ‘C:\DBases\Data’ (C:\DBases\Data\WBe06.mde)
or
-download directly from our website a new ‘WBe06.mde’ and place it in ‘C:\DBases\Data’ (C:\DBases\Data\WBe06.mde)
launch Metadata Utility and you are Done!
Metadata Utility is by design capable to accommodate ANY XML / Metadata Management. This means, that if you use ANY other ‘Media Center’ like product –there are some other Windows Media center competitors/replacements out there–, then Metadata Utility could support those products as well.
Having that said, those features are NOT part of the current production version of Metadata Utility at this time.
Should we incorporate support for other Media Center like products, then, Yes, you will also get a free upgrade though new functionality may require an additional License.
We are already thankful to our user’s already own a License of Metadata Utility. We certainly appreciate your support, for example in helping us with the translations in other languages, but donations are not necessary at this point (though we are thankful for you desired support).
You can help us with the translation part and submit that information through our support forum.
Spread the word around! and let other friends know that Metadata Utility is the best solution to effectively and easy manage a Windows Media Center Library Metadata Information : ).
See Q&A ‘- What languages are supported in Metadata Utility? ‘ click here.
For more information, see sections: ‘Metadata Utility – Operation – Object Management’ and ‘Metadata Utility – Operation – Caption Management’ click here.
Yes. See Q&A ‘- What languages are supported in Metadata Utility? ‘ click here.
For more information, see sections: ‘Metadata Utility – Operation – Object Management’ and ‘Metadata Utility – Operation – Caption Management’ click here.
English is the ‘default’ language for the User Interface. That said, using ‘Object Management’ and ‘Caption Management’ you can change the display of Window(s), Report(s), Button(s) as needed. For more information, see sections: ‘Metadata Utility – Operation – Object Management’ and ‘Metadata Utility – Operation – Caption Management’ click here.
See ‘Metadata Utility – Buttons’ – ‘Events’ Section click here.
‘Metadata Utility’ is built with flexibility in mind.
The ‘Chk’ Field allows you to place any other Value, for example ‘3’, ‘4’, etc (must be a Numeric Value) in the field and later using the ‘Advanced Filter’ Functionality in Metatada Utility, then be able to sort for that Value and build, per say, an specific Queue of Record(s) you may whish to analyze and work on.
-‘Media Library’ Records
Metadata Utility’s ‘Media Library’ Queue represent the actual Movies in your Movie Collection that are available for Windows Media Center to play.
For additional information, see the section ‘Metadata Utility – Buttons’ click here.
-‘Pending’
Metadata Utility’s ‘Pending’ Queue represent Movies which you have either downloaded the Metadata Information either through Metadata Utility Online Search Tool or entered Manually, but are yet to be added to your Movie Library.
In other words, you have NOT downloaded the movie and it is not available for Windows Media Center to play, but you have selected to pre-download the Metadata of those ‘Pending’ Movies that you will soon be adding to your Windows Media Center Library to play.
For additional information, see the section ‘Metadata Utility – Buttons’ click here.
-‘Selected’
Metadata Utility’s ‘Selected’ Queue represent Records that you have selected for Batch Processing.
For additional information, see the section ‘Metadata Utility – Buttons’ click here.
-‘Suspect’
Metadata Utility’s ‘Suspect’ Queue represent Records that have been marked as a suspect record and requires your attention.
A ‘Suspect’ Record can be identified by having a ‘Chk’ Value of ‘1’. This Value will be visible in the ‘Chk’ Field in Metadata Utility.
Generation/selection of a ‘Suspect’ Record may have been automatically been flagged/selected by Metadata Utility during a Batch Job processing and/or may have manually been set by you as a ‘suspect’ record.
If during a Batch Job processing, Metadata Utility detects an anomaly with the Record or Movie, then it will automatically ‘flag’ the record as a ‘suspect’.
Examples of how/why a Record may be marked as a suspect are (and not restricted to, listed in no particular order):
-Path of the movie is not found or the Path of the movie is incorrect –thus the movie is not found–
-important and missing Data on the record was found
-Metadata Utility was unable to generate and/or properly format the XML File
For additional information, see the section ‘Metadata Utility – Buttons’ click here.
-‘Orphan’
Metadata Utility’s ‘Orphan’ Queue represent Records that have lost or do not have the main Metadata Information.
There are several reasons ‘why’ you could have an ‘Orphan’ Record. Some of those reasons are (and not limited to, listed in no particular order):
-you deleted a Master record (deletion done in Metadata Utility Online Search Tool) AND you had entered that record into your ‘Media’ Library in Metadata Utility.
-you accidentally created a record in your Media Library in Metadata Utility and later realized, you don’t have/or don’t want that record, and thus, you had deleted in Metadata Utility Online Search Tool. In that case, pieces called ‘Child Record(s)’ may have been left still in Metadata Utility, thus you will end up having those left over pieces
For additional information, see the section ‘Metadata Utility – Buttons’ click here.
-‘Last Online Search’ Queue
shows you records that were last searched using the ‘Movie Online Search’ Tool. You will noticed that once you’ve click on the ‘LOS’ Button, Metadata Utility will read ‘Metadata Utility: Last Online Search’ and the Button will not read ‘Archive’.
For additional information, see the section ‘Metadata Utility – Buttons’ click here.
-‘Archive Record(s)’ Queue
shows you records that have been marked in the ‘Archive’ Queue. Records in the ‘Archive’ Queue represent those Records that you don’t (yet) have (or no longer have) in your Media Library but you whish to still keep the already downloaded Metadata in within Metadata Utility.
For additional information, see the section ‘Metadata Utility – Buttons’ click here.
In that case, then add the Letter that you have mapped to your system. For the example above, if you have NAS
\\192.168.199.53
\\192.168.199.54
where
\\192.168.199.53 is mapped to ‘Y’
\\192.168.199.54 is mapped to ‘Z’
then you would create the following entries in Path Builder 01:
Y:
Z:
Note: there is NO Backslash after the Mapped letter as Metadata Utility will do that automatically (see in Section ‘Path’ as described before (InserLinkHere)).
Personal Computer
Yes. For more information, refer to Microsoft’s documentation on Windows Media Center.
Windows Media Center (PC).
Universal Naming Convention.
A UNC path uses double slashes or backslashes to precede the name of the computer.
For Example:
\\myWMCPc.
Windows Media Center then (and always) reads the ‘cached’ ‘XML’ File information from your local profile from your Windows Media Center PC only.
But Why?
Simple answer: That is how Windows Media Center Works
Simple answer – expanded: Windows Media Center treats your Movie location always as source
Simple answer – expanded more: Since Windows Media Center may (or may not, depending how your ‘XML’ File settings) delete the ‘XML’ File if an expiration Data has been reached, thus for this reason, Windows Media Center may (or may not) delete the ‘XML’ File only from your profile (cached information). This one of the many reasons ‘why’ sometimes there are posting on different forums of people having Cover Art maybe showing in Windows Media Center, but no movie detail(s) information showing in Windows Media Center (one possible explanation of the many, many other options… other possible Options???… ‘XML’ File is corrupt/improperly formatted, ‘XML’ File does not exists, duplicate ‘XML’ Files for the same movie, etc, etc, etc)
Geek me out and explain me more:
Without getting too technical, as it certainly can, Windows Media Center splits how any movie is accessed through Windows Media Center:
-Movie target (based on the movie Path you set up in Windows Media Center), and
-if any Metadata Information is available to Windows Media Center, then this information will reside in an ‘XML’ File that (is stored in your local profile in your PC and) Windows Media Center uses to store the detail information about the movie (such as Cast, Director, Genre, Overview, Studio, etc).
Since the announcement by Microsoft, that the automated indexing services for Windows Media Center will be (or already has been, depending when you read this) shut down, it means that Windows Media Center will no longer have the functionality to automatically download that (Metadata) information. This may/will result on Movies not displaying Movie Art and not being able to display any details on your movie library.
Furthermore, the automated indexing service that was Provided by Microsoft, could have an expiration date. This means, that even if the Metadata Service that Microsoft provided and on any possible downloaded Metadata Information, could have an ‘expiration’ –which is stored also inside the XML File– date which once reached that date, then Windows Media Center will automatically delete that information and may no longer display details of any given movie in your library.
Metadata Utility allows you to take complete control of your Metadata Management and this means, that you are able to not only remove those ‘expiration’ Dates but also have always complete control of your Metadata Information for your movie Library.
When you enter a movie using Metadata Utility, it will automatically generate the necessary ‘XML ID’. However, you can always override and/or enter a personalized and/or pre-existing ‘XML ID’ if you need to.
Editing and/or changing ANY of the Values on any of the Drop Down Categories/Lists, will cause to ANY existing Records to re-write the Value/Category that you just edited/changed.
Same will apply if you ‘delete’ a List from any Drop down.
The ‘only’ Safe way to ‘delete’ (for example) an existing Value/Category from a Drop Down List is to first check in Metadata Utility if that value is being used (using ‘Advanced Filters’). If you verify that none of your records are using the Value you want to delete, then you can only then safely do so (delete the Value from the drop down list).
Great question. This is an ‘advanced’ question that dives more into the architecture of Metadata Utility.
The easiest answer without going too technical into the complex architecture that runs in the background in Metadata Utility, in other words, the bottom line and shortest answer is as follows:
As indicated before, Metadata Utility is an RDBMS with Normalization Rules built into it.
Metadata Utility stores an ‘Index’ Value for any given ‘Drop Down’ list. For Example, if you edit ‘\\192.168.199.54’ to ‘\\192.168.199.59’, the Index Value in the back-end tables, remains exactly the same and only the ‘new’ Value that you just edited is referenced each and every time that you access the record and basically Metadata Utility makes the ‘translation’ that for example Index Value ‘1’ that used to be associated with ‘\\192.168.199.54’ is not associated with ‘\\192.168.199.59’ and just shows you in the front end the ‘new value’. If this answer got you lost, then maybe a representation will help.
| Index Value | OLD.NAS.Name/IP | New.NAS.Name/IP |
| 1 | \\192.168.199.53 | \\192.168.199.59 |
| 2 | \\192.168.199.54 | \\192.168.199.59 |
| 3 | \\192.168.199.55 | \\192.168.199.59 |
| 4 | \\192.168.199.56 | \\192.168.199.59 |
| 5 | \\192.168.199.57 | \\192.168.199.59 |
Note: This same principle applies to all drop down lists in within Metadata Utility (ie. ‘Duration’, ‘Studio’, ‘Data Provider’, ‘MPAA Rating’, ‘PathbBuilder 01’, ‘MPAA Rating’, ‘PathbBuilder 02’
As you can see, even though you edited the list and changed/updated the Values, Metadata Utility will always and still will reference Index ID 1 for ‘\\192.168.199.53’ now renamed to ‘\\192.168.199.59’ and so on, and so on, and so on (now we got a ‘bit’ more technical but many of our user’s love to see these details)
If you wanted to ‘consolidate’ the list to instead showing now 5 exact same values to just 1, we have a Case Study using Advanced ‘Filters’, which, though long, will address and allow you to process the ‘cleaning’ and end up at the end with just one new value ‘\\192.168.199.59’. Additional information can be found in our Case Study ‘Metadata Utility – Applying Filters’ (Inser_Link_Here).
(this process can also be reversible at a later time… but how? I don’t know what am I reading!… I can’t handle it!… then don’t worry, you don’t need to get this deep : ) –but this shows you a bit more what we meant when we said, that Metadata Utility is a powerful tool : ) ).
Once you start using it and as seen on the ‘Advanced’ section, you will see how powerful it is to have the data Stored this way.
For more information, visit our following section(s):
-Metadata Utility – How To’s.
-Metadata Utility – Case Studies.
You have a few options:
-If you have multiple NAS Storages
For Example you have the following Servers:
192.168.199.53 is the IP for NAS53
192.168.199.54 is the IP for NAS54
192.168.199.55 is the IP for NAS55
192.168.199.56 is the IP for NAS56
192.168.199.57 is the IP for NAS57
192.168.199.58 is the IP for NAS58
and in each of the above mentioned NASes, you have one Share called ’00’, then you should create One Resource for each NAS as follows:
\\192.168.199.53\00
\\192.168.199.54\00
\\192.168.199.55\00
\\192.168.199.56\00
\\192.168.199.57\00
\\192.168.199.58\00
The idea is that it is important that Metadata Utility is able to check each individual Storage and verify that they indeed are online, otherwise, if some are offline, you will run into a Timeout and possible and Error during the Batch Processing (XML Generation/Caching, etc). Depending on your Network, Router Model, if Metadata Utility detects a time out, then an Error will be displayed and the Batch Processing will stop. In some older Home Router Brand Models, we have seen that there won’t be a time out event and in that case, Metadata Utility will simply wait and wait and may end up unresponsive.
(Again, if the router returns a time out, then there is AI –Artificial Intelligence– built in Metadata Utility to stop the process but again, it will depend on the Home Router, Brand, Firmware and Model)
What happens if I have Multiple Shares on each NAS? Do I need to create one Resource for each Share?
For Example:
\\192.168.199.53\00
\\192.168.199.53\Aa
\\192.168.199.53\Bb
\\192.168.199.53\Cc
\\192.168.199.53\Dd
\\192.168.199.53\Ee
etc, etc where there is one Share for each letter of the Alphabet until you reach to \\192.168.199.53\Zz
There is no need to enter 20+ ‘Resources’ for the Same NAS. If you create One Resource for one of the Shares on the NAS, it should be ok (in “Home” NAS Environments, normally a NAS will be online, then all the Shares will also be online –though is NOT always the case, but again, that has been the most experience over the years)
For the example given, in that case, you could enter one Share for each Server as a Resource:
\\192.168.199.53\00 (though there are more shares in the NAS, so as long as at least ‘one’ of the available shares on the given NAS is entered, then it should be enough for Metadata Utility to check the availability of that NAS prior to any Batch Job)
\\192.168.199.54\00
\\192.168.199.55\00
\\192.168.199.56\00
\\192.168.199.57\00
\\192.168.199.58\00
(we chose in here to show the same share on each NAS, however the names could be different on each NAS, just make sure you enter the correct Path and Share for at least one share on each NAS).
If you don’t process this step, and just continue to create your Media Library, at some point, whenever is that you decide to run a Batch Job (even if for one record), then Metadata Utility will check if a ‘Metadata Utility Resource’ exists. If none is found, then you will be prompted to enter it, before any Batch Job can be processed.
Before Metadata Utility processes ANY XML action (Generation, Cache, etc), even if only for one record, it will first check if the Resource location is available.
To eliminate redundancies, if for example, a Batch of 1000+ Movie records is to be processed (1000+ XML Files to be processed and generated and/or cached), then you don’t want that Metadata Utility to check each time if the location is available. We would then trust you, that at the beginning of the Batch Job, Metadata Utility will check only once, at the beginning to see if the Resource is available. If yes –Resource is available–, then the Batch Job will start AND you won’t shut down your NAS right in the middle of the Batch Job! (if you do, then Metadata Utility will run into a ‘waiting’ period until a Timeout occurs and fails to copy/generate/cache the necessary files).
Over the years we have seen that that this step can add tremendous amounts of time (if Metadata Utility is to check each time, for each movie, if the location ‘path’ and/or resource is available), especially during batch processing. For this reason, Metadata Utility needs to know where your resources are and will query them at the beginning of any Batch Job only once.
If the answer comes ‘Yes’, then Metadata Utility will process the Batch and generate the needed XML Records.
‘Metadata Utility Resource’ is the main location/Share where your movie files are located.
For Example:
Movies are stored in 2 different NAS Storages:
\\192.168.199.53\00
\\192.168.199.54\00
where as
192.168.199.53 is the IP of NAS01
192.168.199.54 is the IP of NAS02
00
is the Share found on each NAS, where also Movies are stored.
For example:
Your movies are stored in the following mapped partitions:
Y:
Z:
In that case, create the following entries in Path Builder 01:
Y:
Z:
(without the backslash after the ‘ : ‘ –and without the single quotes of course : ))
as well as update your ‘Metadata Utility Resource’ to:
Y:\The_Folder_Where_Your_Movies_Are_Located
Z:\The_Folder_Where_Your_Movies_Are_Located
Yes you can.
In that event, please keep in mind, that your Router MUST be online as in most Home SetUps, the Router also works are your main and only DNS (Domain Name Service) Server.
This means, if your home router is offline, Metadata Utility will keep waiting for the NAS Name response from your home Router and in that case, eventually have a time out with an error. This will happen, even if your NAS is online in your home network –unless you are an expert and have created entries in your localhost file for the necessary NAS resources–.
To avoid this issue, we recommend you enter the IP Address (then Metadata Utility won’t need to wait on an answer from your Router, it will simply Ping the IP Address instead).
Yes.
-Install on the new computer a fresh ‘Default’ Version of Metadata Utility.
-Activate your license on your new computer (only if you intent to use all features of Metadata Utility on the new system)
-Restore from your BackUp into the new computer the following Directory (including all subdirectories and files): ‘C:\DBases’
-You are done!
Yes. See section:
-Metadata Utility Maintenance Main Switchboard – Metadata Utility BackEnd Rebuild or BackUp click here.
You can add to your existing BackUp Job the following Directory: ‘C:\DBases’
Make sure to include in your BackUp Job all files found inside ‘C:\DBases’
Also, see the following sections:
-Metadata Utility Maintenance Main Switchboard – Metadata Utility BackEnd BackUp or Rebuild click here.
-Metadata Utility BackEnd BackUp click here.
-Metadata Utility BackEnd Rebuild click here.
See section
Metadata Utility – Operation – Metadata Utility – Maintenance Switchboard – Linked Table Manager click here.
Metadata Utility’s Linked Table Management allows to Re-Link the Back-End(s) to a new location.
That said, there is no Support provided for custom installations of Metadata Utility. The main reason for this is that over the years we’ve seen ‘custom’ installations of Metadata Utility in ways that are actually NOT correct (ie. Thumbdrive/USB Drive(s), etc) and for those reasons, is that we have the policy in place that no Support will be provided for custom installations of Metadata Utility.
For additional Information, see section ‘Metadata Utility – Operation – Linked Table Manager’ click here.
No. any of the *.mde Files (also called ‘Back-Ends) are used to store your Movie Library Metadata Information.
Without ANY of the *.mde Back-End Files, Metadata Utility will NOT be able to function.
Metadata Utility is licensed per PC (Personal Computer) and NOT per User that logs in to a PC.
As an example: A single License can be installed in One (1) PC. If you whish to migrate your License from your existing registered PC to a new PC, then you must deactivate your license and then move it to the new PC.
If you want on more than one computer to use Metadata Utility to manage your movie Library for more computers, then you have some options:
-you can purchase an additional license for each computer that you want to use the full capabilities of Metadata Utility.
-you can install a new version of Metadata Utility and use the free functionality that is available in all installations of Metadata Utility. For more information see License Comparison vs. Free Version click here.
Note: there is a Maximum limit of 5 Activations per License. After a Maximum License Activation has been reached, then the license will become locked to that last (5th activation) activated PC. There is NO way to extend the activation on any given License once that the activation limit has been reached.
We have had Metadata as part of the large enterprise application for many years –and is still running in that environment, though, as said before, in the enterprise version, Metadata Utility is part of the ‘Utilities’ side of the Enterprise large System and, though manages XML Data, is far from managing Windows Media Center Movie Library/Metadata Information –it manages other types of XML Data–.
In that context, then Metadata Utility is over than 26 years old (as of 2020). That said however, as a stand alone app, Metadata Utility has been for many years on a very tight and limited release to only our already customers from the larger enterprise app.
After a very successful Beta release, which went on for a few years in Beta testing and after many, many requests from our existing customers is that we have decided to launch Metadata Utility as a stand alone app, full with all documentation online and support.
Nothing really. That said however, Metadata Utility’s Icon looks like the State of California with two legs walking, close to running! : ).
Metadata Utility’s Icon was designed by a member in our team that has long passed away. We have then decided, to keep the Icon which has been carried on into the stand alone app of what Metadata Utility is today and keep the memory of our long departed team member alive.
We had the ‘ X ‘ on the main Switchboard deactivated. For years on, we’ve gone back and forward –due to the requests from our customers, when we had it, customers requested that we killed it. When it’s gone, then customers, requested, for some reason, that we bring it back on– with ‘x ‘ on, to ‘x ‘ off the switchboard.
Bottom line is, even with the ‘x ‘ off/grayed out/deactivated on the Switchboard, there are still other ways someone ‘accidentally’ can close the Switchboard.
Those users will just have to learn NOT to close the Switchboard ‘accidentally’ : ).
Closing the Switchboard will close Metadata Utility automatically. That said, on legacy versions of Metadata Utility, closing the Switchboard will render Metadata Utility without it’s Main Switchboard. In such case, you will need to close the application and launch it again. Since the ‘ X ‘ to close Metadata Utility is grayed out, you will need to use your keyboard:
While having Metadata Utility window active, then press on your keyboard:
ALT + F4
(while pressing the ALT key on your keyboard, then press the F4 key – Metadata Utility will close –abnormally, but it will close–).
Subscription Service, Cloud Services (together with a Subscription Service) would be some example(s) of ‘possible’ additional features.
Having that said, (over the years) we have refrain from implementing such features into Metadata Utility. The main reasons are for security reasons. For you to store your Metadata, which you originally downloaded from the cloud (internet), to basically put it back up (in the cloud!)… so question would be, why (you) would download the Metadata in the first place? : D.
We’ve had over the years some Beta Versions of cloud services where you basically would build your entire Metadata Library on the web and keep it there. That said however WILL then require you to have constant (and good) internet connection as well as a good, VERY good, actually even MORE than VERY GOOD Data service. Think about if you actually built a 13,000 Movie Library and you are actually downloading each time say the entire 7 GB from the cloud????… yeah… we thought too :D.
Remember that, Metadata Utility’s main goal is to give you complete and independent control of your movie library so that even without an internet connection, you will be able to manage your entire movie library. For example what if you have a Media Center Library setup in a vacation home that has little or limited internet connection?… or those that for example live on the road (like RV travelers, etc). For those scenarios is where Metadata Utility shines at its best, as it is specially built to work independently with out without an internet connection. Of course to download the Metadata Information automatically from the Web, you will need initially an Internet connection. That said, once you have built your Library in Metadata Utility, then it is no longer an issue whether you have an Internet connection or not to independently manage your entire Movie Library.
*For the ‘Cabin in the Woods – Vacation Home’ example as well as RV Travelers, etc, we are assuming that your movie library is also locally available on the same network storages as you had originally configured (or otherwise, you can use the advanced features in Metadata Utility to re-create your new XML Files on those locations ie. Vacation Home, RV, etc.).
Yes (if any bugs were to be found). For new functionality, an additional License may be required.
Due to demand, we offer 30 Days as well as 6 Month and 1 Year Licenses. Each License is valid from the Date of Purchase.
For example, if you have a 1 Year License and you purchase a new License one month before you existing License expires, then your new License will be valid from the date you purchase it (not from the date your existing license expires).
Our Standard Lifetime Licenses are NOT affected by this. If you purchase a Lifetime License, then you own that License will never expire.
Note: Lifetime Licenses and/or 6 Moth, 1 Year Licenses have each a maximum of 5 Activations per each License. After the 5th activation limit has been reached, then the License will become locked to the 5th activated PC.
We offer online support as well as access to Metadata Utility’s online documentation 24x7x365 Days a year at no additional cost.
you can process your purchase through our store. We accept through Paypal all major Credit Cards (Visa, Mastercard, American Express) worldwide.
Metadata Utility is free to download and install. To use the advanced features you will need a License for Metadata Utility.
hmmmmmm … NO, Seriously?! : D
hmmmm…Seriously?
As an example, ‘Metadata Utility’ Size on a:
1,400+ Movie Library: 2.3 Mb (Megabytes, NOT Gigabytes–)
5,000+ Movie Library: 9.0 Mb (Megabytes, NOT Gigabytes–)
The incredible compact size of the Metadata Information is achieved through an RDMS (Relational Database Management System) that is primarily with focus on Normalization Standards for Data Storage. There for, Metadata Utility is by Design, optimized to eliminate any possible redundancies in the Data, while keeping all the necessary information for any given Movie.
Yes on the enterprise version System (which does not manage Movies ; ), thus NOT for personal/home use.
See ‘What other versions of Metadata Utility are available?’ click here.
Having said that and as mentioned before, Metadata Utility is part of a large enterprise System and in that environment, Metadata Utility is used to manage other XML files (other than manage Windows Media Center Metadata Files/Information).
Metadata Utility is available as a stand alone application –for the time being– for a personal/home use.
As the name suggests, ‘Company Contacts’, though over than 25+ years old, allows you to keep track of your Company Contacts. This portion was never in use in the large enterprise System, though fully functional and with some reports even available.
This section was designed primarily for you to keep contact of the companies that you may have applied for a position and better help you to track your application process.
For additional information, see ‘What are ‘Online Contacts’ and ‘Company Contacts’ doing in Metadata Utility?’
As the name suggests, ‘Online Contacts’, though over than 25+ years old, allows you to keep track of your Online Contacts. Though some of the once famous chat apps are not even longer online (such as AOL Instant Messenger, Yahoo Messenger, etc), you can still use ‘Online Contacts’ to track the people you have contact online. Some reports are still available for this section as well.
For additional information, see ‘What are ‘Online Contacts’ and ‘Company Contacts’ doing in Metadata Utility?’
Metadata Utility is part of a very large, scalable and robust ERP, CRM, Fulfillment Management, Case Processing, Call Center Support (to list a few capabilities) Enterprise System. Metadata Utility is part of the back-end part in the support area of the large enterprise System and is primarily designed -in the enterprise solution- for other related XML Management Tasks –not Windows Media Center Metadata Management : D —
Some years ago, it was decided to spun Metadata Utility as a separate entity, allowing to reduce substantially the size and scale of the enterprise system. During that process, two small and unused portions from the enterprise System were also moved into what became Metadata Utility, thus ‘Online Contacts’ and ‘Company Contacts’ are present in Metadata Utility. As you will notice, the appearance of ‘Online Contacts’ and ‘Company Contacts’ is quite ‘Dated’ and that shows Metadata Utility’s age over the years.
‘XML ID’ is the value that Windows Media Center utilizes to link any given movie to the downloaded Metadata Information.
For additional information, refer to the details how Metadata Utility allows you to create and manage your movie library.
See Metadata Utility Free vs License Comparison click here.

